THE BEST, THE VERY BEST HUMMUS

If you ask me to make a list of things I could eat on a daily basis, hummus will show up as #1. Simple as that.

Bewitching Kitchen

We eat hummus all the time. Almost always store-bought, because we actually like the two brands available in our neck of the woods: Sabra and Athenos. Sometimes I refresh it with a little lemon juice, olive oil, some cumin or paprika, but sometimes we just dig in, straight from the container. I have quite a few hummus-like recipes in the blog, departures from the classic, using avocado, edamame, even pumpkin. Oddly enough, I never posted the classic, chickpea-tahini entity. Until now, that is. The recipe I tried this past weekend was a revelation, and I am still kicking myself for taking such a long time to try it, when bloggers and cookbook authors have been raving about it for ages. This is the way hummus is prepared in the Middle East. The prominent flavor is exactly what is intended to be: chickpeas and tahini. No distractions. The texture…

View original post 581 more words

TWICE-BAKED GOAT CHEESE SOUFFLE

From a distant blogging past, a favorite appetizer or light main dish, easy but impressive…

Bewitching Kitchen

If you’re intimidated by the prospect of making a souffle, then this recipe is a special gift for you.  This double-baking method (oven time separated by hours,  if convenient) is great for entertaining: no more guessing about when’s the correct time to put the souffle in the oven;  no more anticipating when the guests will be ready to eat the puffed-up, gorgeous masterpiece.    Plus, I’ve always felt that  individual servings (in this case individual souffles) makes each guest feel special. 😉 The recipe comes from Secrets of Success, one of my favorite cookbooks.

TWICE-BAKED GOAT CHEESE SOUFFLE
(from Michael Bauer’s Secrets of Success, original recipe from Barbara Mulas & Mark Drazek)

butter for greasing ramekins, plus 3 Tbs
1 cup bread crumbs
3 Tbs cake flour
1 cup milk, warmed slightly in a microwave
10 ounces goat cheese, divided
3 large egg yolks
salt and…

View original post 738 more words

POP-TARTS WITH STRAWBERRY BALSAMIC JAM

Pop-Tarts were not part of my childhood, in fact I had no idea what they were all about until I was around my beloved husband’s kids in their teenage years. Of course, making them from scratch is a lot more fun than ripping a package open and sticking the little pastry in a toaster. And if that was not enough, you have to deal with another package to get the drizzle going. Granted, it takes longer to make it from scratch, but in my opinion, it is totally worth it.

POP-TARTS WITH STRAWBERRY BALSAMIC JAM
(jam from Pastries Like a Pro)

for pastry:
280 g all-purpose flour
38 g sugar
½ tsp kosher salt ¾ cup
172 g cold butter, cut in pieces
120 mL ice cold water

for strawberry jam:
1/3 cup balsamic vinegar
1/3 cup water
700 g sugar
575 g strawberries, hulled and sliced
1 teaspoon coarse ground black pepper

for glaze:
65 g powdered sugar, sifted
2 + 1/2 to 3 tablespoons heavy cream
sprinkles of your choice to decorate

Combine the flour, sugar and salt in the bowl of a food processor. Pulse a few times to combine the ingredients. Add the cold butter, pulsing until the mixture resembles coarse crumbs. Add the water to the flour-butter mixture and pulse until little clumps start to form. Turn the dough onto a lightly floured surface and press into a disk. Refrigerate while you make the jam.

Place all the ingredients for the jam in the order listed in a saucepan at least three times as large as the ingredients as it will rise up really high when it come to a rolling boil. Cook until it reaches 200 F, mashing the strawberries gently as they cook down. Refrigerate until needed.

Roll the dough to ⅛-inch thickness, and cut into sixteen 3 x 4-inch rectangles. Line a baking sheet with parchment paper. Place 8 rectangles of pie dough on the baking sheet, top each rectangle with 1 tablespoon strawberry jam. Top with a second rectangle of dough, and crimp around all sides with the tines of a fork. Using a small, sharp knife, cut 3 small slits in the top of each pie. Place in the refrigerator for 15 minutes before baking, or for several hours.

Bak in a 425F oven until golden brown, about 20 minutes, depending on your oven. Allow to cool to room temperature. In a small bowl, whisk together the powdered sugar, heavy cream and vanilla until smooth. Frost the cooled pies with glaze and top with colorful sprinkles.

ENJOY!

to print the recipe, click here

Comments: This would be a perfect recipe to make for kids, you can change the filling, use chocolate, butterscotch, other types of jam, including store-bought if you want to make life a little easier.  The recipe for the jam makes a large amount, you can make half and still have enough with plenty of leftovers. It is delicious, it has a kind of gourmet aura with the balsamic (that you will notice) and the black pepper (barely there, but adds complexity).

Sprinkles are optional, but mandatory in the Bewitching Kitchen!

ONE YEAR AGO: Ptichye Moloko, a Russian Dessert

TWO YEARS AGO: Cheesy Low-Carb Zucchini Tarts

THREE YEARS AGO: Blogging Hiatus

FOUR YEARS AGO: Apricots, Three Ways

FIVE YEARS AGO: Up Close and Personal with Kale

SIX YEARS AGOBlack Berry Cherry Sorbet

SEVEN YEARS AGO: Asparagus Pesto

EIGHT YEARS AGO: Chocolate and Chestnut Terrine

NINE YEARS AGO: Under the spell of lemongrass

TEN YEARS AGO: Greens + Grapefruit + Shrimp = Great Salad!

FIVE STRANDED BRAIDED BREAD & A COOKBOOK REVIEW

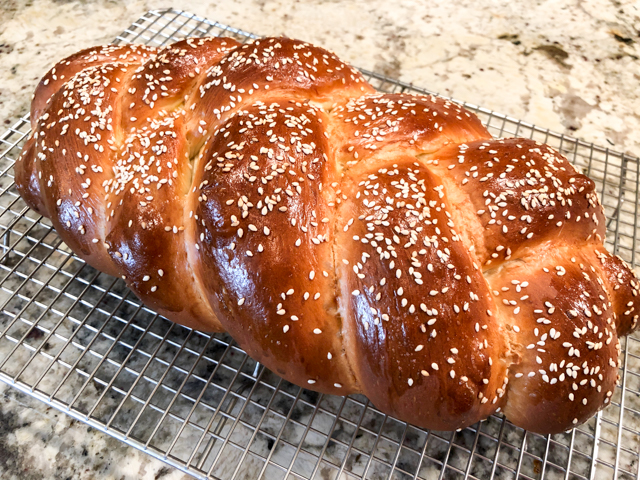
Braids, twists and elaborate knots fascinate me. I suppose it’s the repetitive pattern leading to elegance and serenity. Tying things together in harmony. When it comes to bread, going past the three-strand braid can be intimidating, but trust me, once you get the pattern going it is quite simple. A few months ago I was searching for videos on youtube to help me understand the process and found a gem of a cookbook: The Art of Braiding Bread, by Roberto von Krammer. His instructions are crystal clear and easy to follow.  I share with you my first attempt at a five-stranded braided bread.

FIVE-STRANDE BRAIDED BREAD
(adapted from The Art of Braiding Bread)

345 g bread flour
30 g sugar
26 g egg yolks
48 g whole eggs
26 g mild vegetable oil
110 g water
7 g salt
10 g instant yeast

Place all the ingredients in a Kitchen Aid type  bowl. Knead on first speed for 3 minutes until all the ingredients are thoroughly incorporated, then on second for approximately 5 minutes.

Ferment for 2 hours. The dough can also ferment overnight in the fridge. If you prefer to do that, allow it to sit at room temperature for one hour, then degas it gently by pressing it down, and place in the fridge. Press it down gently again two more times over a period of two hours.  A colder dough temperature makes it easier to form strands. The dough can be divided and shaped straight from refrigeration.

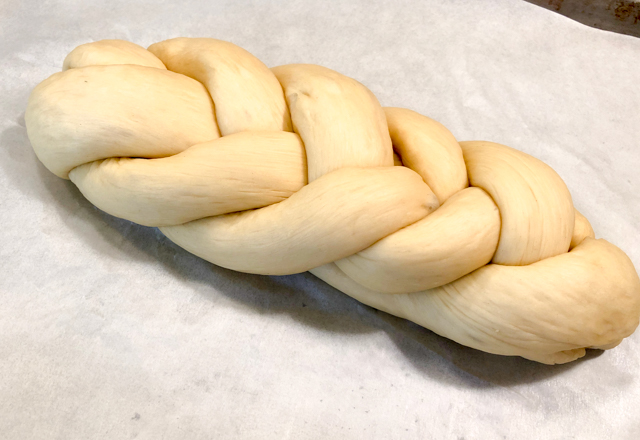
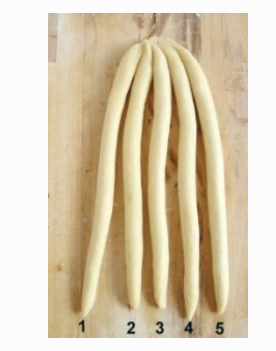
Pre-shape 5 round of dough and rest on an unfloured work surface, covered with plastic. When relaxed enough to be elongated without tearing, usually 10 to 15 minutes, roll out the strands and form the braids (process in the comments). Once braided, proof the loaves covered with baker’s linen and a sheet of plastic to prevent the formation of a skin.

Final fermentation after braiding: ½ to 2 hours at about 25 C.

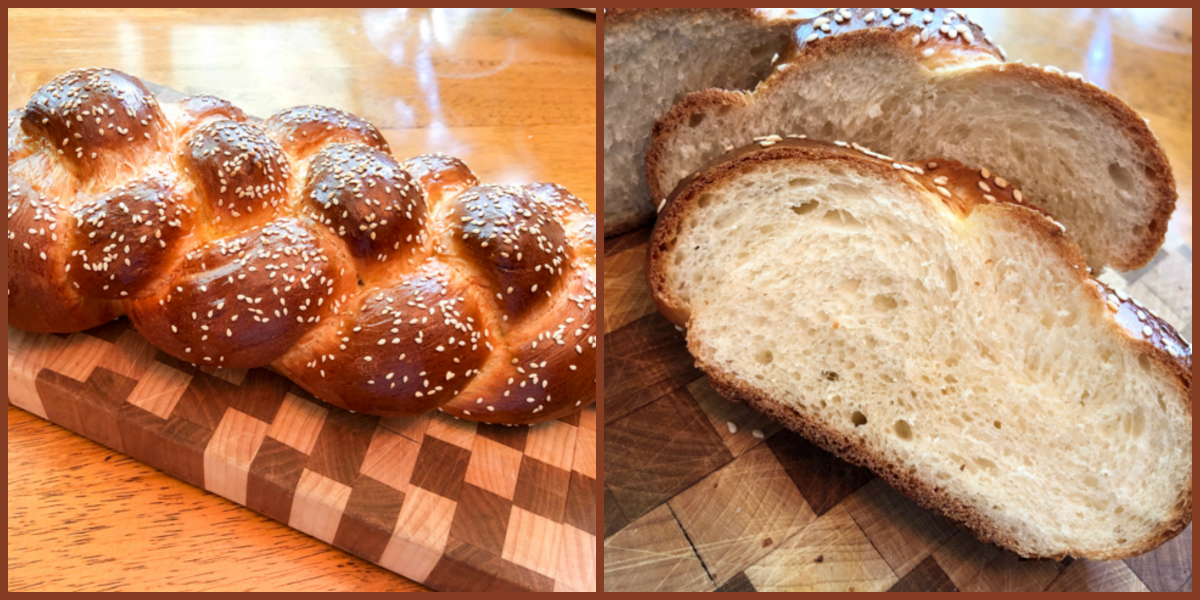
Heat oven to 375 F. Before baking, thoroughly egg wash the surface of the loaves. If desired, sprinkle poppy or sesame seeds on top. Bake until golden brown and internal temperature is about 200 F, about 30 minutes.

ENJOY!

to print the recipe, click here

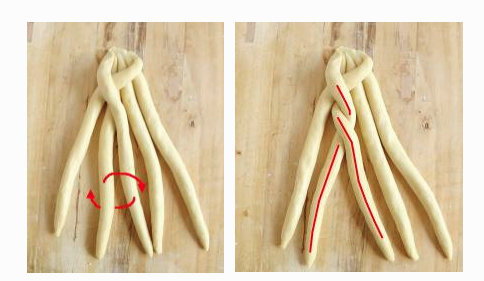
Comments:  With Mr. Krammer’s permission, here is the process to form a 5-stranded beta braid. First thing is to number the strands from left to right, then keep in mind that as the strand moves around, then new formation also gets numbered the same way, first strand to the left will be number 1, last one to the right will be number 5. If strand #5 jumps in between strand #1 and #2, it will become strand #2 in the new formation.

 Place #5 between #1 and #2

Move #1 between #3 and #4

Place #2 over #3 and #3 under #2 (twist)

End of cycle, repeat all over again until you reach the end of the bread.

By going through the process, you’ll end up with a beautiful 5-strand braid, that is then allowed to ferment until almost doubled in size.

I also made a Four-Braided Alpha loaf, and you can see that it generates a totally different look.

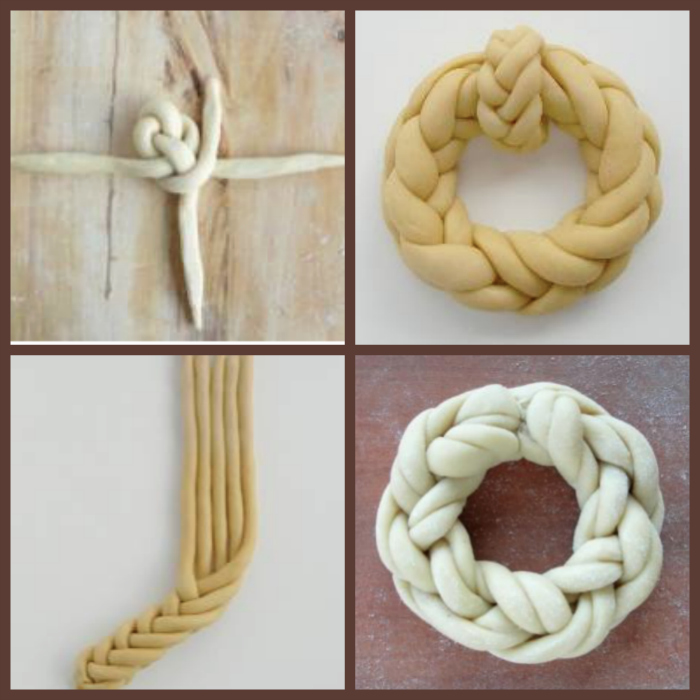
Now for the book. I could not believe how many different styles of braiding bread exist. From the number of strands used to the actual braiding, it is mind-blowing! You can use the basic dough for all of them, dividing the dough in the appropriate number of strands, and then deciding which method to follow. For each one Roberto provides pictures of EACH movement of the strand, plus the numeric pattern that you can memorize and repeat as you become more comfortable and experienced.

You will find several methods of braiding for 3, 4, 5, and 6 stranded loaves that go way beyond what you might imagine. Some braiding methods are challenging, but his instructions are so clear and the pictures of each step make it all doable.  I will definitely be challenging myself to the more complex styles, including braided round loaves, and breads that stack braids together.

This composite photo shows a few examples of the many found in his book, which I highly recommend! Click on his name below the recipe title for buying info.

A braided bread never fails to impress because it is so festive, and of course you can use other types of dough, with chocolate, or even going into a savory territory. Don’t be intimidated, and have fun with it!

ONE YEAR AGO: Green Olive Salad

TWO YEARS AGO: Coffee Macarons Dressed up to Party

THREE YEARS AGO: Blogging Hiatus

FOUR YEARS AGO: Tomato Tatin

FIVE YEARS AGO: Headed to Colorado!   

SIX YEARS AGO: Farofa Brasileira

SEVEN  YEARS AGO: Thai-Inspired Pork Tenderloin

EIGHT YEARS AGO: A yummy Brazilian cake: Bolo de Fuba’

NINE YEARS AGO:  Summer’s Tomatoes

TEN YEARS AGO: Leaving on a jet plane… 

SUN-DRIED TOMATO AND FETA CHEESE TORTE

This is definitely one showstopper of an appetizer! Try it and you can thank me later….

Bewitching Kitchen

I first made this torte in 2001, for a large cocktail party to celebrate  my beloved’s Birthday.  We’d  never hosted quite so many people  (perhaps 60),   and this layered appetizer was one of the highlights of that memorable night.   The recipe came  from  Chiqui, a caterer from New Orleans, whom I “net-met” many years ago.    I hope you’ll consider it for your next dinner party, or for a potluck.  I recently made it again for another birthday party, so I might have to start calling it “Birthday Torte”.   😉

FETA CHEESE TORTE
(adapted from Chiqui)

1/2 cup slivered pine nuts, toasted (I substituted slivered almonds)
1 cup sun-dried tomatoes, packed in oil
1/2  garlic head, roasted
8 ounces feta cheese
1/2 stick unsalted butter
8 ounces cream cheese
1 tsp white pepper, ground
2 Tbs vermouth
1/2 cup arugula pesto (or regular basil pesto, preferably homemade)

Prepare the…

View original post 534 more words