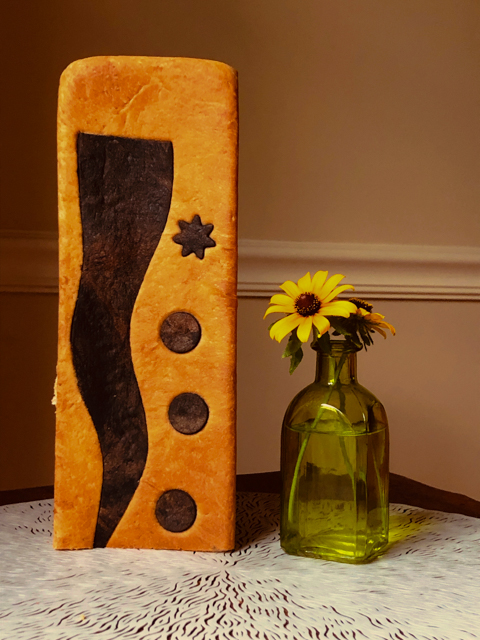
The idea for this bread came from a cookbook called “Le Grand Livre de la Boulangerie” which I recently impulse-bought. I fell in love with one of the recipes and in less than 24 hours was trying it in our kitchen. It is a simple pain de mie (I modified a King Arthur recipe for it), but with bread dough decorations placed on top right before baking. Imagine the possibilities!
PAIN DE MIE WITH DECORATIONS
(inspired by Le Grand Livre de la Boulangerie)
basic Pain de Mie formula from King Arthur Flour)
175 g milk
260 g water
97 g butter
2 + 1/2 tsp salt
32 g dry milk
40 g potato flour
40 g sugar
650 g all-purpose flour
2 + 1/8 tsp instant yeast
fine charcoal powder (about 1/2 tablespoon)
Combine all of the ingredients, except the charcoal powder into the bowl of a KitchenAid type mixer and knead until fully smooth and with good gluten development (about 8 minutes). Adjust with flour if the dough seems too loose. The dough will be soft and pliable.
FOR THE BLACK DECORATIONS: Remove 180 g of the dough and transfer to a small bowl. Knead by hand into it the charcoal powder (gloves are a very good idea!). When the dough it nice and black, roll it out to about the dimension of a 9 x 13 pan (no need to be exact, the dough will be about 2mm in thickness). Place between two sheets of parchment paper or Silpat, and bake in a 450F oven for a couple of minutes, you just want to set it a bit. Immediately remove from the oven and place in the fridge while you continue proofing the main dough.
Bulk proofing: transfer the main, white dough to a lightly greased bowl and allow the dough to rise until puffy though not necessarily doubled in bulk, about 1 + 1/2 hours, depending on the warmth of your kitchen.
Lightly grease a 13″ pain de mie pan. Gently deflate the dough, transfer it to a lightly greased work surface, shape it into a 13″ log, and fit it into the pan. Cover the pan with lightly greased plastic wrap, and allow the dough to rise until it’s just below the lip of the pan, 45 minutes to 1 hour.
Towards the end of the rising time, preheat the oven to 350°F, and work on the decorations. Take the sheet of black dough out of the fridge, cut it in any shapes you want, keeping in mind the dimensions of the top of the loaf.
When the dough is ready to bake, carefully place the decorations on top, close the lid and place in the oven. Bake for 25 minutes, open the lid, and bake for 20 minutes more, until internal temperature is at least 190F (mine reached 200F).
Remove from the oven, take the bread out of the pan and allow it to cool over a rack before attempting to slice it.
ENJOY!
to print the recipe, click here
Comments: First of all, let me tell you about the book. It is in French and in the words of one of the authors, Chef Jean-Marie Lanio, it is geared towards professionals and “home bakers with skills.” Don’t expect detailed instructions, it is basically a series of formulas with one word (yes, one word) to describe expected dough texture, one word to describe shaping, and a general expected timing for proofing. Truth is, you need to be very comfortable with baking in general (the book is not only on bread) to put it to use. But the recipes are stunning, always some little twist to make each production unique and special. Come to think of it, baking from this book is like setting yourself up for a technical challenge. But with a huge advantage: no cameras around! Pretty much a win-win situation…

In their recipe, they use a pâte fermentée viennoise as one component and I did not have that around. Being the impatient being I am, I wanted to try the recipe right away. I also don’t have the Pullman loaf pan with the exact dimensions they recommend. So I went to King Arthur site, and from their basic recipe adjusted amounts, hoping for the best. I am thrilled that it worked so well on my first attempt. Trust me, that almost never happens in the Bewitching Kitchen.
Making the recipe exactly as described, and using the same pan I did (PADERNO 41750), you will be a bit unsure if it will work, because the dough will be pretty low in the pan as you shape it and place it inside. Don’t worry, in a little over one hour it will rise substantially and in fact I had to push down a little bit the top to make sure I could add the decorations and have some space between the top of the dough and the lid. It worked perfectly well. The crumb is exactly what you expect from this type of bread, soft, a tad on the sweet side, and a bit buttery.
In the book, they gilded the lily a step further, by adding a line of white flour on top of the black decorations. I just could not make that work, no matter how I tried to deal with the flour (piping bags, piping tips, straws), my lines were never smooth and beautiful, so I skipped that part. I now wonder if rice flour would have worked, as it has a different texture. Anyway, I am super happy with the way it turned out, it’s a nice technique to play with. Imagine how many designs and even colors you can come up with…
As I hit publish and look at the date on my calendar, I realize that exactly one year ago I was being eliminated from a certain show in a certain tent. It is hard not to feel that sadness trying to hit me again, but this too shall pass… and a good bake definitely helps exorcize certain demons….
ONE YEAR AGO: Five-Stranded Bread
TWO YEARS AGO: Green Olive Salad
THREE YEARS AGO: Coffee Macarons Dressed up to Party
FOUR YEARS AGO: Blogging Hiatus
FIVE YEARS AGO: Tomato Tatin
SIX YEARS AGO: Headed to Colorado!
SEVEN YEARS AGO: Farofa Brasileira
EIGHT YEARS AGO: Thai-Inspired Pork Tenderloin
NINE YEARS AGO: A yummy Brazilian cake: Bolo de Fuba’
TEN YEARS AGO: Summer’s Tomatoes
ELEVEN YEARS AGO: Leaving on a jet plane…


And this is a GREAT bake! Don’t just kept it exorcise those demons, let it smash them to pieces 👊🏻👊🏻👊🏻
You are forever our Star Baker 🌟🌟🌟
LikeLiked by 1 person
THANK YOU!!!!!
LikeLiked by 1 person
I love this. AnotheR enticing bread – and so stylish with the decorative flourishes.
And you were a treat to watch on “that show” ❤️
LikeLiked by 1 person
well, being kicked early allowed me to meet you! so there you go… win win situation!
LikeLiked by 1 person
it was such a pleasure that day
LikeLike
Art with texture, flavour and joy!
LikeLiked by 1 person
this bread in some odd way, makes me think of you, did you know that? 😉
LikeLike
maybe you’re not only a baker but more a sculptor! truly awesome…
LikeLiked by 1 person
no mathematics was insulted in the making of this bread. I approve this message… 😉
LikeLike
That is so interesting and fun! That photo on the dark place mat almost makes it looks like you can see the place mat through the hollow bread.. kind of an optical illusion!
LikeLiked by 1 person
ha!!!! that is true! now I “see” it…. it was a fun bake, especially because I hyperventilated all my way through it, until I finally opened that lid…. 😉 I am sure you understand….
LikeLike
I was just looking at pullman pans online! We have been eating a lot of sandwiches lately and my shaping skills are weak. I wonder if a stencil would have worked to get a flour line?
LikeLiked by 1 person
I am planning on doing stencil next time I try this – for his particular design of the book, it would be impossible – I mean, I think maybe he could have a special stencil made just for that – it was truly spectacular and very long and thin. But definitely a stencil would work, if I do it as in a regular bread, just a bit of moisture and then lay the stencil on top – I have many patterns I can try, although not that beautiful wavy line he made.
LikeLike