
If you are a serious chocolate lover and have a special occasion coming up – a birthday, anniversary, or a dinner party for dear friends – this cake is for you. All components can be made in advance if you prefer, although I would advise you to bake the decorative Jaconde layer on the day you intend to assemble the cake. It is a very delicate component, I would be a bit worried about keeping it in the freezer or fridge for a while. Raspberries mellow the overall sweetness in a nice way.
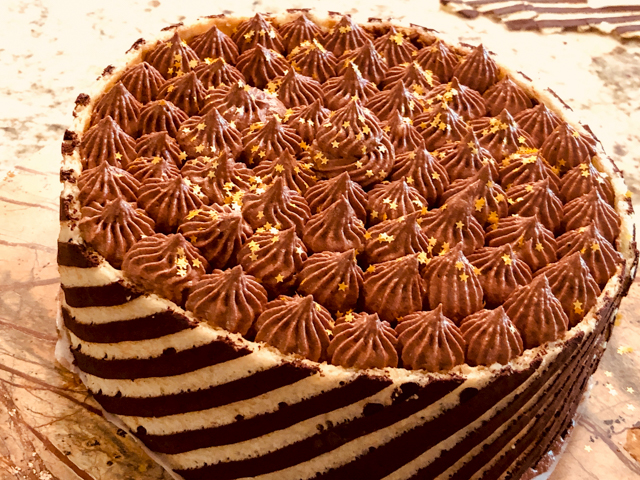
CHOCOLATE CELEBRATION CAKE
(inspired by many sources)
for the decorative layer:
50 g butter
56 g powdered sugar
60 g egg whites
56 g all-purpose flour
25 g cocoa powder
Mix the butter and sugar in a Kitchen Aid type mixer with the paddle attachment until creamy. Add the egg whites very slowly, a little at a time. Clean the sides of the bowl often. Add the flour and cocoa powder and gently mix on very low-speed. Spread on a silpat or parchment paper using a spatula. Aim at a very thin layer. Using a comb, make diagonal stripes removing the paste, exposing the paper underneath. Freeze for 10 minutes (or longer, overnight is fine)
for the Jaconde layer:
65 g powdered sugar, sifted
36 g all-purpose flour
65 g almond flour (or ground almonds)
100 g whole eggs
120 g egg whites
30 g granulated sugar
75 g unsalted butter, melted and cooled
Heat the oven to 400 F. Add powdered sugar, flour and almond meal to the bowl of a mixer. Mix gently to incorporate them. Add the eggs and beat on high-speed for about 5 minutes, until very fluffy. Reserve.
Make a meringue with the egg whites and sugar, bringing it to soft peaks. Start with the egg whites in the mixer on low-speed, increase to medium, once you see a trail forming as the mixer is going, start adding the sugar slowly. Once you get to soft peaks, stop. Over-beating the meringue will make it hard to incorporate it in the cake batter. Gently fold the meringue on the egg-flour mixture that you reserved. Add a bit of the mixture to the bowl with melted butter, mix gently. Pour that into the cake batter and gently fold.
Remove the design from the freezer, pour the batter over it, trying to level it as best as you can with an off-set spatula. You want to keep the air incorporated in the batter, so be gentle. Run the spatula just over the surface, you don’t want to risk disturbing the pattern underneath it.
Bake for 12 to 14 minutes. You need to start noticing a little browning on the surface, but not much. If you notice the edges getting crunchy, remove from the oven. Let it cool before proceeding. Invert on a flat surface covered with parchment paper, and remove the paper that held the design during baking. Reserve.
for the chocolate cake:
55 g unsalted butter; plus more for the pans
230 g egg yolks
140 g granulated sugar
15 g cocoa paste, chopped
80 g cake flour
35 g cocoa powder
190 g egg whites
Pinch of cream of tartar
A pinch of salt
30 g granulated sugar
Heat the oven to 350 F. Prepare the cake pans by lining them with parchment paper. Grease just the center of the paper.
Place the egg yolks in the bowl of the stand mixer fitted with the whisk attachment, and mix on medium speed while gradually pouring the 140 g sugar. Once all the sugar is added, increase speed to high and whisk until it forms a ribbon (this will take several minutes, keep going, there is no risk of over-beating egg yolks).
While the egg yolk mixture is mixing, melt the butter in a small saucepan; remove from the heat. Add the cocoa paste, stir gently until fully melted. Reserve to cool slightly. Sift together the flour and cocoa powder; set aside on a piece of parchment paper to make it easier to add to the mixer bowl later.
In a clean mixer bowl, combine the egg whites, cream of tartar, and salt and mix on high speed. When the whites are foamy, slowly add the 30 g (about 2 tablespoons) granulated sugar, and then whip to medium-stiff peaks. At this point you do not want to risk over-beating the whites, because they will be tough to incorporate with the cake batter if they are over-beaten. If in doubt, beat less rather than more.
Fold the butter and cocoa paste mixture and one-third of the dry ingredients into the egg yolk mixture until barely combined. Continue folding in the dry ingredients in two more additions, stopping just before the dry ingredients are incorporated. Add one-third of the meringue and fold until just combined. Then pour the barely-mixed chocolate mixture into the remaining meringue and fold until the batter is almost homogenous, but do not overmix.
Evenly divide the batter between the cake pans and bake for about 25 minutes, until the top springs back when pressed lightly. Allow to cool to room temperature before inverting and removing from the pans.
for the cremeux filling:
2 g sheet gelatin
300 ml heavy cream
70 g egg yolks,
45 g granulated sugar
Pinch of table salt
115 g chocolate (preferably 70% cocoa)
fresh raspberries
Put 10 g (2 teaspoons) cold water in a small bowl. Use scissors to the gelatin sheet into small pieces so they fit inside the bowl. Submerge the gelatin in the water; set aside to bloom.
Combine the cream, yolks, sugar, and salt in a saucepan, and stir well to combine. Cook the mixture on medium-high heat, stirring constantly with a whisk at first and then switching to a spatula. Continue cooking, stirring constantly, until the mixture reaches 158-162 F, then immediately remove it from the heat. Add the gelatin and stir until it is completely dissolved.
Put the chocolate into a large bowl. Pour the hot cream mixture over the chocolate; let sit for a minute to melt the chocolate. Whisk to combine, then use an immersion blender to emulsify completely. Refrigerate, without a lid, and allow to set fully for several hours. You can make it the day before.
for the buttercream frosting:
150g softened butter
400g icing sugar
200ml heavy cream
150g dark chocolate (melted, and cooled slightly)
4 tbsp cocoa powder
golden sprinkles for decoration (optional)
Combine the butter and icing sugar in the bowl of a Kitchen Aid mixer fitted with the paddle beater. Beat until well combined, adding the cream slowly once the mixture starts to be homogeneous. Add the melted dark chocolate and the cocoa powder then beat vigorously until smooth and workable. Place in a piping bag fitted with the tip of your choice, I used Wilton 1M.
Assembling the cake: Place the cake on a board over a rotating cake support. Add a ring of chocolate buttercream around the edge of the cake to retain the filling. Place a good amount of chocolate cremeux covering the cake layer, then add fresh raspberries. Place the second cake (cut side up) on top, press gently. Spread a thin layer of chocolate buttercream on top and sides. Now very carefully measure the height of the cake.
Cut the Jaconde layer to be just a tad taller than the cake when rolled around it. You should have more than enough to go around the cake using two pieces of Jaconde. For an 8-inch cake, you need about 25 inches total, so cut one layer as big as you can, and use a smaller portion to fill the gap. Press gently to make sure it glues well to the side of the cake. Don’t forget, the pattern should face the outside of the cake (yes, stuff happens).
Pipe decorative stars all over the top with the buttercream, sprinkle with golden stars, if that suits your taste. Refrigerate for several hours before slicing.
ENJOY!
to print the recipe, click here

Comments: I enjoy the process of making decorated Jaconde, but let me be brutally honest: it is messy. I don’t care how neat of a cook you are, it will be messy. You need the pattern to go all the way outside the parchment paper, because it is best to maximize the area of cake with good, solid pattern on it. At least for my skill level, boo-boos happen here and there. The pattern must be frozen before adding the cake on top, so make sure you have space in your freezer to lay a baking sheet flat with the paper on top.
I’ve made a patterned Jaconde in the past, but with a stencil. Having used this method now, I believe the stencil is easier, because it is hard for the comb to remove the batter efficiently. Sometimes I had to spread the batter with the spatula and pass the comb twice or three times until I got a nice, clean surface underneath. By doing that, it’s hard to get stripes that are identical in width. The end result will be a bit more rustic, just keep that in mind. Nothing wrong with rustic. Right? I thought so.

The cake is obviously very rich and feels pretty decadent, a small slice will be enough. I thought it was very delicious, the buttercream does not taste overly sweet. A few little tweaks could be considered for a next version: the pattern could be red to reflect the fruit inside, and in addition to fresh raspberries in the filling, I would add a spread of raspberry jam on the cake before spooning in the cremeux. Finally, perhaps adding a few fresh raspberries in the middle of the piped frosting could be cute, making the piped stars to be similar in size to the berries. The golden star-shaped sprinkles? They stay in any version, I am quite fond of them.


ONE YEAR AGO: Incredibly Simple Times Four, May 2018
TWO YEARS AGO: Tangential Quiche with Asparagus and Fennel
THREE YEARS AGO: Fakebouleh
FOUR YEARS AGO: Yellow Squash Soup
FIVE YEARS AGO: Grilled Chicken with Tamarind and Coconut Glaze
SIX YEARS AGO: Chicken-Apricot Skewers
SEVEN YEARS AGO: Asparagus Quiche
EIGHT YEARS AGO: Two-stage Pea and Prosciutto Risotto
NINE YEARS AGO: Mellow Bakers: Corn Bread

Oh wow this looks awesomely delicious 😋
LikeLiked by 1 person
it is not low-cal… but a small slice does not hurt… (fingers crossed)
LikeLike
I’d probably be the one who wraps the jaconde patterned side in so thanks for the warning! This is one gorgeous cake. I bet it disappeared immediately.
LikeLiked by 1 person
This actually happened in a Great British Baking Show, the poor woman – she actually wrapped one of the sheets ok, and the other inside out – there was nothing she could do after to fix it. But they did not give her a hard time, these things happen to anyone, and her cake tasted awesome anyway
LikeLike
It looks divine! And so fancy!!! Who knows, maybe some day I will have the courage to try making it!
LikeLiked by 1 person
It is so much fun! Just divide the process in a couple of days, and it’s a piece of cake! (sorry, could not resist)
LikeLiked by 1 person
Haha! I serve your joke in a silver plate 😉. I’ll keep this as a winter project when my girls are at school…
LikeLiked by 1 person
Work of art Sally!!! Beautiful job!!!
LikeLiked by 1 person
There’s always a little room for improvement, but I think next time I do a pattern it should be a bit less stressful… (fingers crossed)
LikeLike
Really…less stressful?? Lol.
LikeLike
How beautiful! Love those stripes!
LikeLiked by 1 person
Thank you! glad you enjoyed the post!
LikeLike
I’m going to try this out soon. I finally have a freezer that I can freeze stuff like this in a flat layer. And… Thanks so much for linking to First Monday Favorites. You inspire me every month.
LikeLiked by 1 person
It is a pleasure to participate each First Monday!!!!
LikeLike