
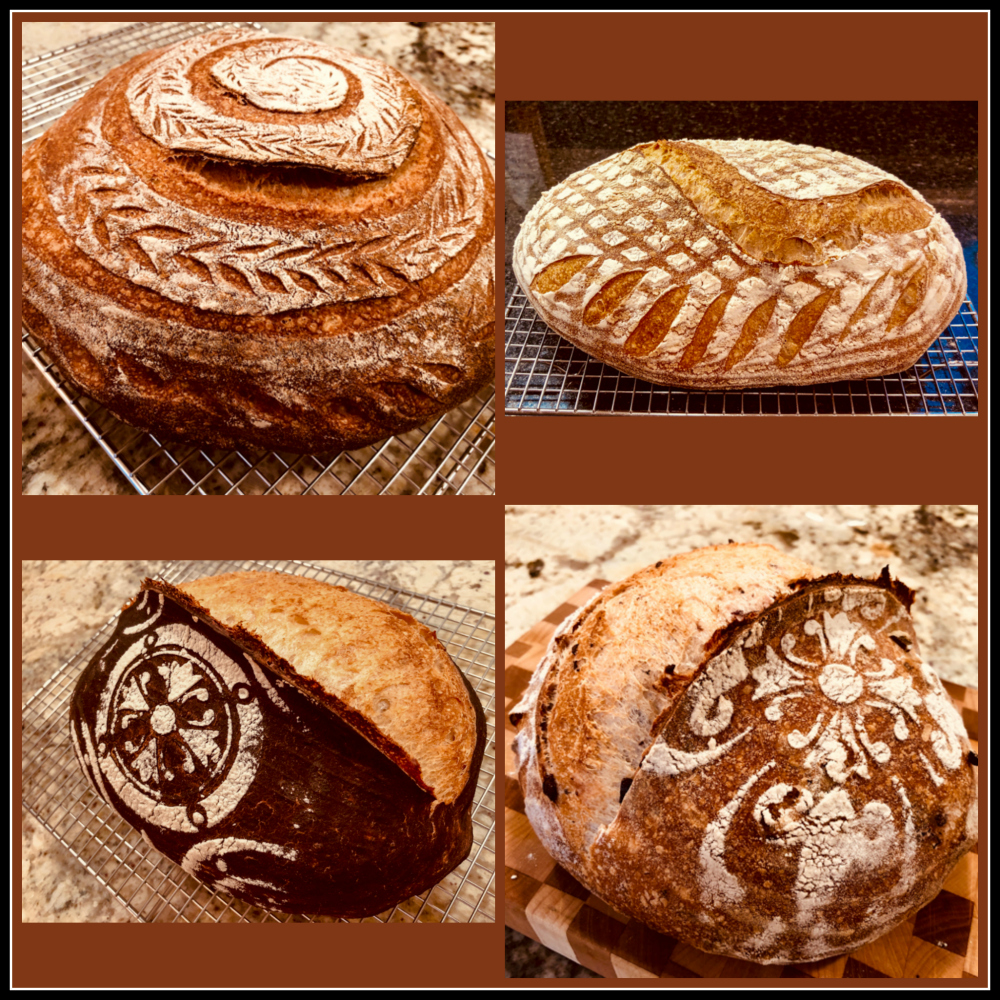
Today I share four different ways to play with sourdough… Different amounts of whole-wheat flour, different ways to slash and decorate it, and a version studded with a mixture of Kalamata and green olives that was probably the winner with the resident bread taster.
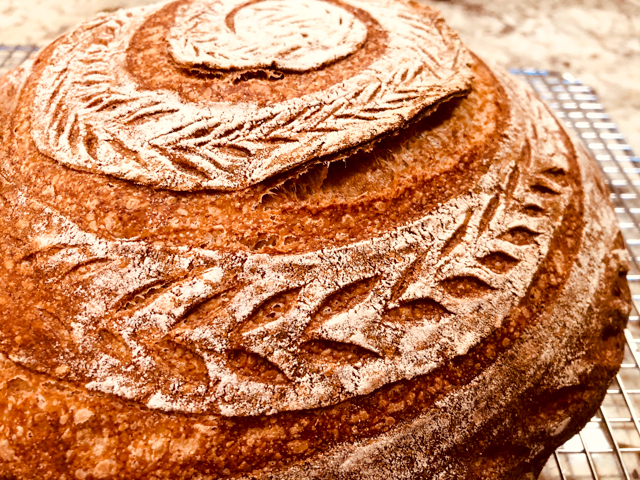
First, a loaf that pushes the level of whole-wheat a bit higher than I normally go for. I am calling it 50:50 sourdough, for obvious reasons
50:50 SOURDOUGH
(from the Bewitching Kitchen)
100 g active sourdough starter at 100% hydration
390g water
250g whole-wheat flour
250g bread flour
10g salt
Dissolve the starter in the water in a large bowl, mixing well until it is well-dispersed. Add the flours and salt, mix with your hands or with a wooden spoon until it forms a shaggy mass.
After 20 minutes, do a minimal kneading, about 10 times or so until the dough becomes smooth. You will now allow the dough to ferment for 4 hours at room temperature, folding the dough every 40 minutes, and keeping it covered with plastic. You don’t have to be precise, but allow the full four hours fermentation to take place. You can do foldings at 40 min, 1h 20 min, 2 hs, 2 hs 40 min, 3 hours 20 min. After that final kneading, leave the dough undisturbed for 40 minutes more, then proceed to shape as a round (or a batard, if you prefer).
Place inside a banetton well dusted with flour and keep it in the fridge overnight, from 8 to 12 hours.
Next morning, heat the oven to 450F.
Invert the dough on a piece of parchment paper and lightly, very lightly coat it with flour, then rub all over the surface with the palm of your hand. Score the pattern of your choice.
Bake at 450F for 45 minutes, preferably covered for the first 30 minutes to retain steam. Cool completely over a rack before slicing.
ENJOY!
to print the recipe, click here

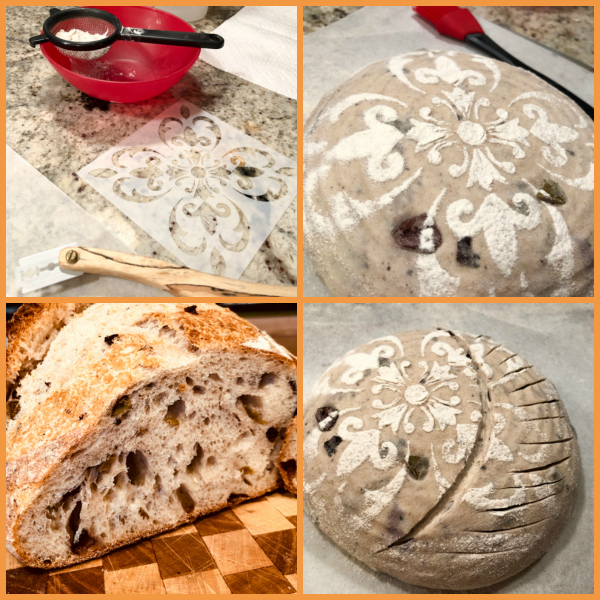
Comments: The amount of whole-wheat flour in this bread makes it hearty and quite filling. I kept the hydration level of the final dough at 78%, because it makes it easier to slash the surface. If the hydration is too high, it’s a lot harder to get a pattern going. I started from the center and drew a little spiral, not too deep but deep enough to coach the bread into opening a bit. Then I use a brand new razor blade to form the design inside the spiral. I really liked the way it turned out, and the crumb was more open than I expected.
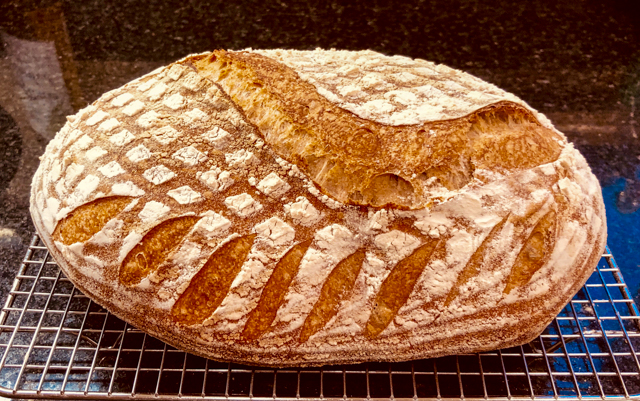
Next, a very similar formula, but lowering the level of whole-wheat a little bit.
70:30 SOURDOUGH
(from the Bewitching Kitchen)
100 g active sourdough starter at 100% hydration
400g water
350g bread flour
150g whole-wheat flour
10g salt
Dissolve the starter in the water in a large bowl, mixing well until it is well-dispersed. Add the flours and salt, mix with your hands or with a wooden spoon until it forms a shaggy mass.
After 20 minutes, do a minimal kneading, about 10 times or so until the dough becomes smooth. You will now allow the dough to ferment for 4 hours at room temperature, folding the dough every 40 minutes, and keeping it covered with plastic. You don’t have to be precise, but allow the full four hours fermentation to take place. You can do foldings at 40 min, 1h 20 min, 2 hs, 2 hs 40 min, 3 hours 20 min. After that final kneading, leave the dough undisturbed for 40 minutes more, then proceed to shape as a batard (or a round, if you prefer).
Place inside a banetton well dusted with flour and keep it in the fridge overnight, from 8 to 12 hours.
Next morning, heat the oven to 450F.
Invert the dough on a piece of parchment paper and brush off all the flour stuck from the banetton to keep it as clean as possible. Place the stencil of your choice on top of the bread, shake some all-purpose flour, lift the stencil carefully. Slash the bread in a way that will be compatible with the design. You need to cut one or more reasonably deep slashes to coach the bread to open in those spots.
Bake at 450F for 45 minutes, preferably covered for the first 30 minutes to retain steam. Cool completely over a rack before slicing.
ENJOY!
to print the recipe, click here

Comments: The overall technique remained the same, but the reduction in the proportion of whole-wheat makes the bread considerably lighter not only in color but also in taste. Since the slashing was going to be a lot simpler and the main decoration would come from the stencil, I increased the hydration a little bit to 80%.
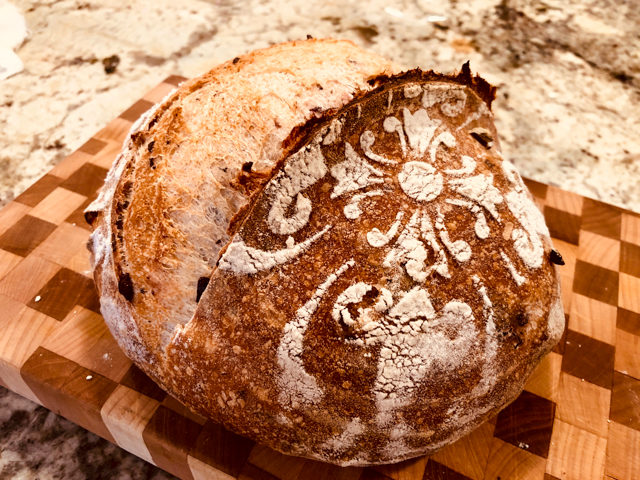
Next, comes a loaf with even less whole-wheat in the formula, but made more special thanks to the inclusion of a good amount of olives, both Kalamata and green. I had never mixed two kinds of olives in the same loaf, and I can tell you this will be happening again soon. Phil decided this might very well be his favorite bread of 2019. It turned out divine, even if I say so myself.
MIXED OLIVES SOURDOUGH
(from the Bewitching Kitchen)
50 g active starter
380 g water
470 g bread flour
30 g whole-wheat flour
9 g fine sea salt
150 g pitted green and kalamata olives, chopped
1 tsp Herbes de Provence
Dissolve the starter in the water in a large bowl, mixing well until it is well-dispersed. Add the flours and salt, mix with your hands or with a wooden spoon until it forms a shaggy mass.
After 20 minutes, do a minimal kneading, about 10 times or so until the dough becomes smooth. You will now allow the dough to ferment for 4 hours at room temperature, folding the dough every 40 minutes, and keeping it covered with plastic. On your first folding cycle, add the mixture of olives. You can do foldings at 40 min, 1h 20 min, 2 hs, 2 hs 40 min, 3 hours 20 min. After that final kneading, leave the dough undisturbed for 40 minutes more, then proceed to shape as a round (or a batard, if you prefer).
Place inside a banetton well dusted with flour and keep it in the fridge overnight, from 8 to 12 hours.
Next morning, heat the oven to 450F.
Invert the dough on a piece of parchment paper and brush off all the flour stuck from the banetton to keep it as clean as possible. Place the stencil of your choice on top of the bread, shake some all-purpose flour, lift the stencil carefully. Slash the bread in a way that will be compatible with the design.
Bake at 450F for 45 minutes, preferably covered for the first 30 minutes to retain steam. Cool completely over a rack before slicing.
ENJOY!
to print the recipe, click here
Comments: A light crumb due to the smallest proportion of whole-wheat (only 6%), and a hydration of 76% bumped a little bit due to the water content of the olives. The presence of the olives also made me reduce slightly the amount of salt.
Hard not to use superlatives to describe this bread. Green olives are definitely under-appreciated and I admit to this sin. Of course the Kalamatas bring a lot of flavor and moisture, but there is definitely a lot more happening through the slightly sharper nature of the humble green creatures. I did not pay close attention to the ratio of the olives in the mix, but I think it was pretty close to 50:50. The crumb turned out pretty open and very moist, difficult to eat only one slice, and it went well with pretty much anything we paired it with, including a nice lentil soup made by the husband.
To get the best effect of a stencil design made with white flour, start with the bread inverted from the banetton and delicately but thoroughly brush off any residual flour that might have stayed glued to the surface. Then sprinkle the white flour over the stencil of your choice. If the bread has any flour on the surface, the design won’t be as evident after baking. The other thing to keep in mind is that you need to try and avoid the bread from opening right in the middle of your design. The best way to avoid that is to make a deep slash coaching the dough to open where you want it to. You can never be 100% sure it will work, but that’s your best bet. You can see how I dealt with it on the composite picture above.
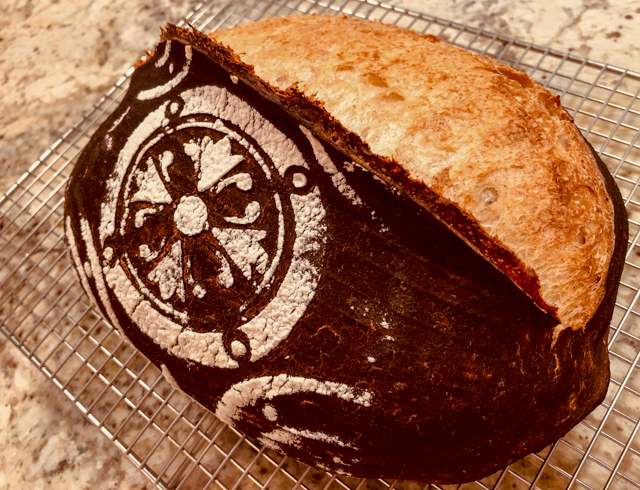
Finally, I share a bread that used the exact same formula of the previous one, but no olives. In this case, my main goal was to do a white-on-black stencil design. Some bakers use charcoal powder, I decided to go with black cocoa powder, the kind that is used to bake Oreo type cookies.
BLACK COCOA SOURDOUGH
(from the Bewitching Kitchen)
50 g active starter
380 g water
470 g bread flour
30 g whole-wheat flour
10 g fine sea salt
water and black cocoa powder to form a thin paste
Dissolve the starter in the water in a large bowl, mixing well until it is well-dispersed. Add the flours and salt, mix with your hands or with a wooden spoon until it forms a shaggy mass.
After 20 minutes, do a minimal kneading, about 10 times or so until the dough becomes smooth. You will now allow the dough to ferment for 4 hours at room temperature, folding the dough every 40 minutes, and keeping it covered with plastic. You can do foldings at 40 min, 1h 20 min, 2 hs, 2 hs 40 min, 3 hours 20 min. After that final kneading, leave the dough undisturbed for 40 minutes more, then proceed to shape as a round (or a batard, if you prefer).
Place inside a banetton well dusted with flour and keep it in the fridge overnight, from 8 to 12 hours.
Next morning, heat the oven to 450F.
Invert the dough on a piece of parchment paper and brush off all the flour stuck from the banetton to keep it as clean as possible. Make a paste with cocoa powder (preferably dark) and water. Brush the surface of the bread with it, then immediately place the stencil of your choice on top of the bread, shake some all-purpose flour, lift the stencil carefully. Slash the bread in a way that will be compatible with the design.
Bake at 450F for 45 minutes, preferably covered for the first 30 minutes to retain steam. Cool completely over a rack before slicing.
ENJOY!
to print the recipe, click here
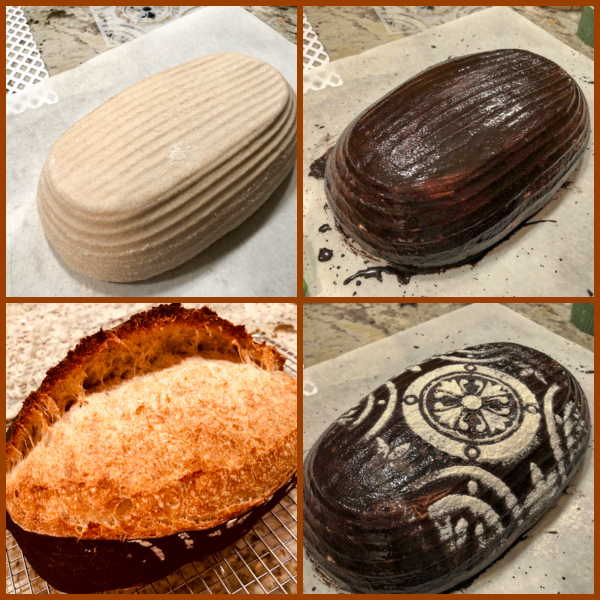
Comments: The goal for this bake was to play with a new stenciling technique. After the shaped dough is inverted out of the banetton, simply make a little paste of cocoa powder and water, liquid enough to brush with a silicone brush, but not too soupy. Then, add the stencil on top and dust with all-purpose flour. I imagine other colors could be used. Beet powder, sweet potato powder, butterfly pea powder… I am not sure the red color of beet powder would be preserved during baking, I tried using it in the dough once, and the result was a brownish color with very little to do with my expectations. Worth giving it a try, I am sure. Even if it turns brown, could be still a nice contrast with the white pattern of the stencil. I should mention that there is absolutely no taste of cocoa in the baked bread.
The bread had absolutely amazing oven spring, which in a way messed up the design a little, but a baker should never complain of too much oven spring, since that can upset the Gods of the Sourdough and result in failure after failure for months to come. Yeah, I am a scientist. Very pragmatic. But I try to keep a sense of humor.
Final remarks: these loaves use a very simplified method. I did not do autolyse, and did not bother adding the salt later, it all went into the dough at the same time. As you can see from the photos, I got enough oven spring and a nice crumb using these shortcuts. Also, I never bother waiting for the shaped bread to sit at room temperature before baking, or keeping the oven at 450F for an hour before baking. Some bakers insist those steps are important for a good bake. They are not. Once the oven reaches temperature, my cold, shaped bread goes in. It amazes me that people would waste so much energy heating up an oven to very high temperature for a long time before baking their loaves. Trust me, it is not at all necessary.
ONE YEAR AGO: When bad things happen to good people
TWO YEARS AGO: Sweet Potato “Hummus”
THREE YEARS AGO: Cauliflower Crust Pizza
FOUR YEARS AGO: Silky Rutabaga Puree
FIVE YEARS AGO: Bon Bon Chicken: Light and Spectacular
SIX YEARS AGO: Red Wine Sourdough Bread with Cranberries
SEVEN YEARS AGO: Award-Winning Sourdough Baguettes
EIGHT YEARS AGO: Country Rye (Tartine)
NINE YEARS AGO: Penne a la Vechia Bettola

Love it! Love all of your lovely loaves, and agree totally with everything you said in your final comment x x x keep sourdough simple!
LikeLiked by 1 person
simple works. so why complicate?
LikeLiked by 1 person
Absolutely!
LikeLike
Stunning Sally!!
LikeLiked by 1 person
Thank you, my dear! great to see you here…
LikeLiked by 1 person
These truly look spectacular Sally. How did you make your starter or where did you get it.
LikeLike
I made it myself 10 years ago, and now I am using one a friend sent me from England = please check your email
LikeLike
These are spectacular looking Sally. I have played with starters before but never successfully. What, who or where should one go for a not too complicated way to begin to make a starter?
LikeLike
Four in one post! These all look amazing. You are the master at decorating your bread! I also have ear envy.
LikeLiked by 1 person
Karen, a compliment about bread coming from you leaves me with no other option but to break into the extended version of the Happy Dance! 😉
LikeLike
wow there must be something in the air! every blog i look at today is about sourdough. i know it’s popular but … 🙂 Yours look very delicious. cheers sherry
LikeLiked by 1 person
Haven’t been able to surf blogs lately, I am away from the US until this weekend… who knows, maybe there is some sourdough day we knew nothing about?
(honestly, I find all those days of food a bit ridiculous… 😉
LikeLike
wow,,, as I sit here waiting to put some pumpernickle rye in the oven.. I watch your quartet and truly they all harmonize beautifully sally. I am always fearful to go back to rye but I want to get rid of that fear because I love rye so so so much .. so here I am.. This one has Altus(leftover bread soaked in water) beer, caraway, molasses, a 100% rye starter.. I am thrilled to offer it to my community supported bread lovers !
I have been having success with red fife, sonora, emmer, payaten, red corn meal.. just using one third of these ancient grains to 2/3 to regular bread flour and it brings out amazing flavors.. bring back more flavor is my motto and help the farmers grow wheat that is good for the planet.. Anyway.. baking is good for the soul and for making new friends and keeping all your old ones!! Enjoy your sourdough train!
LikeLiked by 1 person
rye is not for sissies, and I admire you for baking with it. of course, I love to add a little bit of rye to some of my sourdough breads, but baking a bread that is mostly rye… that requires A LOT of skill… the flavor is hard to beat, though… truly spectacular!
LikeLike
These all look fantastic! The stencil designs are so pretty. This makes me want to feed my starter and do some baking!
LikeLiked by 1 person
it’s a lot of fun indeed, and the stencils open a lot of possibilities to bread decorating – without affecting flavor.
LikeLike
I love your bakes – they all look amazing! May I ask why in some recipes you have to refrigerate the dough for 8~12 hours after the final proof, and in some other recipes (such as the one you used for smaller rolls) you bake it straight after the final proof?
LikeLike
Those breads look amazing! I have tried sourdough in different bakes but not bread yet. May I ask why in some recipes you refrigerate the dough for 8~12 hours after the final proof (seems to be the standard in many blogs), and in some other recipes (such as the one you used for smaller rolls) you bake it straight after the final proof?
LikeLiked by 1 person
Mostly for convenience, I prefer to retard the sourdough overnight – it also improves flavor, but it would not be the main reason I would do that. I like the way the dough handles while very cold – so if I want to do some type of artistic slashing, or stencil stuff, it’s easier if the dough is cold
Smaller rolls would probably work well, but to be honest I am afraid that being so small they could end up over proofing in the fridge, so I tend to work with them right away.
but it would not hurt to “run a few experiments”
😉
I also like to bake early in the morning – particularly in the summer, when the oven heats up the kitchen too much – another reason why retarding the bake helps!
LikeLike
Pingback: A SOURDOUGH QUARTET — Bewitching Kitchen – Sarah's Attic Of Treasures