Sometimes I wonder what makes me try a new recipe. Of course, reading tons of cookbooks and food blogs, new things show up on my radar often. I might make a mental note to try it at some point, labeling them as intriguing or interesting, but for the most part I move on. Then, there’s Pink Praliné Brioche. And no easy way to get it out of my mind. Having lived in Paris for a few years, it was hard to accept I’d never even seen one. Pink praliné. The stuff dreams are made of.
PINK PRALINÉ BRIOCHE
(adapted from Murielle Valette’s Patisserie)
3.5g fresh yeast (I used osmo-tolerant yeast)
25ml milk, at room temperature
250g bread flour
5g salt
15g sugar
3 eggs, at room temperature (about 150g)
125g soft butter
120g pink praliné, crushed lightly in a food processor (recipe follows)
egg wash
Whisk the yeast in a small bowl with the milk. Put the flour, salt, sugar and eggs into the bowl of a KitchenAid type mixer. Add the milk and yeast, and knead it for about 10 minutes at low-speed.
Little by little add the butter and continue kneading in low to medium speed until the gluten is well-developed. Place the dough in a bowl lightly coated with oil, cover and place in the fridge overnight.
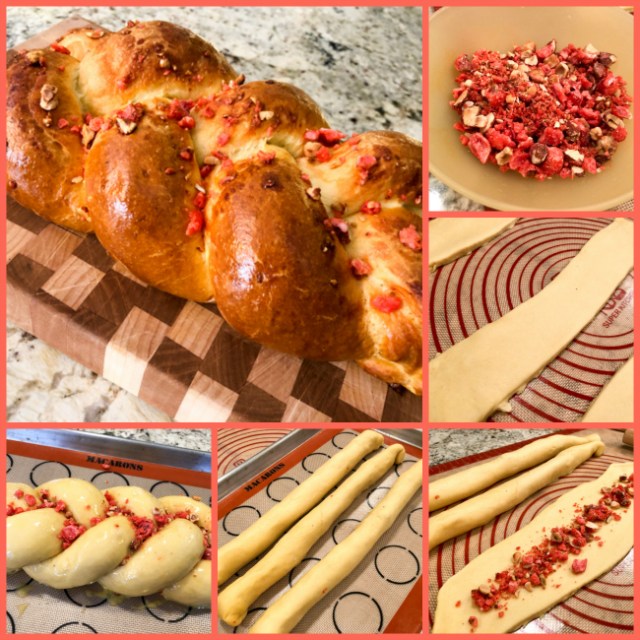
The following day, turn over the dough on a work surface and gently press it as a rectangle of around 8 by 12 inches, then cut it lengthwise in three strips. Roll each piece to flatten it slightly, sprinkle a line of crushed pink praliné in the center, and enclose it with the dough, rolling it well to seal. Do the same with the other two strips, then braid them together, keeping the seam side down at all times.
Sprinkle more pink praliné over the shaped bread, letting them fall in the folds of the braid. Cover loosely with plastic wrap and let it at room temperature for a final rise until it almost doubles in size. Mine took 2 hours and 45 minutes.
Heat the oven to 350 F, and right before baking, brush the surface of the braid with the egg wash. Bake until golden brown, about 40 minutes. Cool completely before slicing.
ENJOY!
to print the recipe, click here
Comments: Brioche dough contains not only flour and yeast, but additional fat in the form of eggs, milk and butter. This type of enriched dough does well with a slow fermentation, so I prefer to mix it the day before. It also makes the actual baking day a lot easier, as you can shape the bread straight from its overnight proofing time in the fridge. It warms up quickly and it’s not hard to work with at all. You could ferment the dough at room temperature for 4 hours or so, but it will be a long baking day. Your kitchen, your call.
If you prefer to buy the pink praliné, amazon sells it, but be prepared to wait, no free 2-day shipping for this one. To make your own, follow the recipe below.
PINK PRALINÉ
(from Cooking with Bernard)
450 g sugar, divided in 150g amounts
A few drops of red food coloring
125g whole hazelnuts, peeled (about 3/4 cup)
125g whole almonds (about 3/4 cup)
Place one-third of the sugar (3/4 cup / 150 g) in a large frying pan with just enough water to moisten it. Add a few drops of red coloring. Stir well and turn the heat to high. Bring to a boil. When large bubbles start forming, add the hazelnuts and almonds, stirring non-stop. Control the heat, so that the nuts don’t burn. The syrup will begin to crystallize, and look very grainy. Don’t despair, keep stirring so that the nuts are well coated in sugar. Keep simmering, the sugar that does not coat the nuts will slowly start to melt and turn into a thick liquid. Transfer the contents of the pan to a baking sheet lined with parchment paper or Silpat. You should have nuts and some “free” caramel-sugar. Reserve the nuts and place the sugar in a clean saucepan.
Add another third of the sugar (150g). Add a little more red coloring and water – just enough to moisten the sugar. Bring to a simmer over low heat. Continue until all the pieces of sugar are completely melted. Switch off the burner, add the reserved nuts to the frying pan, but don’t switch turn the heat on yet. Wait until the syrup in the saucepan reaches 255°F. When the syrup is almost at the desired temperature, switch on the burner below the frying pan. It should be at medium heat. Pour the syrup over the nuts, stirring as you pour. You will need to wash this pan to use it again, so make sure to take it right away to the sink and fill with water.
Coat the nuts. The syrup will once again become grainy. Allow the sugar that does not coat the nuts to melt. Transfer the contents of the pan to a sheet of parchment paper and set the coated nuts to one side and the remaining sugar to the other. Place the remaining pink sugar in the saucepan and add the last third of the sugar (150 g) with more food coloring and enough water to moisten it. Allow to melt and bring to 255°F / 124°C. Return the nuts to the frying pan and pour in the syrup when it reaches the right temperature, stirring constantly. At this third stage, the syrup should coat the pink nuts quite well. Stir and wait for the syrup to become grainy and any sugar that does not coat the nuts should melt again. Pour all the contents of the frying pan onto a sheet of parchment paper. By now, there should be almost no sugar left unstuck to the nuts.
Final step: Heat the oven to 160°F and bake the candied nuts for at least 45 minutes to dry them out completely. Mine took almost double time to dry. Let them cool and store in an air-tight container. They are ready to nibble on or use in recipes.
ENJOY!
to print the recipe, click here
Comments: Making pink praliné is a labor of love. You can buy it ready, but the whole process of making it seemed fascinating enough to make me go for it. Essentially, you are slowly covering hazelnuts and almonds with a red-dyed caramel syrup. The coating happens in three stages. It is a bit time-consuming and also potentially dangerous. I got a burn with one tiny microscopic drop of super heated caramel and trust me, it hurt like hell. Then, it left a tiny scar, perfectly round and brown. Kind of cute, actually. But I don’t recommend it.
Pink praliné is a wonderful snack, and the pups tried some, yes they did. There was intense wagging of three tails. In São Paulo, when I was growing up, they sold a type of peanut made by Japanese immigrants that comes close to pink praliné but not nearly as good. It is called “amendoim doce” (translates as sweet peanut) and you can see it in the link that it also has a pinkish sugary coating, just a bit lighter. Anyway, if you are fond of nuts and feel crazy enough to be around boiling caramel for an extended period of time, try making these babies. They keep for a long time, which is a bonus.
So here it is, the Pink Praliné Brioche! It is absolutely delicious and yes, it was worth the trouble. If you google for photos, you’ll see it in many different sizes, shapes, and variations on how to incorporate the praline in the dough. Some just sprinkle a huge amount on top of a roundish loaf. I like this method better, because some of it gets truly deep inside the bread. The sugar that glues to the nuts melts slightly during baking, and when you bite into it, you get this concentrated sweet taste, truly delicious. It is not sweet like a spoonful of sugar, of course not. The caramelization process gives the sugar a slightly bitter edge. Perfect, according to my taste buds.
ONE YEAR AGO: A Spinach Salad to Write Home About
TWO YEARS AGO: Karen’s Four Hour French Country Bread
THREE YEARS AGO: The Siren’s Song of the Royal Icing
FOUR YEARS AGO: Blog-worthy Roasted Butternut Squash
FIVE YEARS AGO: Chocolate Currant Sourdough Loaf & Roasted Beet Hummus
SIX YEARS AGO: Sesame and Flax Seed Sourdough
SEVEN YEARS AGO: Spanakopita Meatballs
EIGHT YEARS AGO: Saturday Morning Scones
NINE YEARS AGO: Pain de Mie au Levain


Another top job. Lovely work Sally.
LikeLiked by 1 person
Glad you liked it! It was a bit of a labor of love, the praline part, but the bread not that bad. Yin an yang, you know… happens a lot
LikeLiked by 1 person
I was looking forward to this one. Pink praliné? I’ve never heard of it and now it’s a must try! P.S. I have some osmo tolerant yeast too. We are truly geeks.
LikeLiked by 1 person
I suspected you have that too.. because, one never knows when the yeast emergency will pop up!
😉
LikeLike
Completely off topic, but have you seen this: https://tinyurl.com/y6k2enhf
LikeLiked by 1 person
oh that is awesome! I made truffles the “regular way” a couple of weeks ago, and intend to repeat the adventure using this sous vide method you shared.
Unfortunately, I tried tempering choc using sous vide (when I had some hopes of going to the Great American Baking Show) and failed miserably – it simply did not temper for me, even though I was pretty careful with the temperatures etc etc
but this truffle making seems a lot “safer” – and very neat.
thank you!
LikeLiked by 1 person
You’re welcome. Glad I could help YOU for once! 🙂
LikeLiked by 1 person
I think this is like the Pralaline in Paris – something not to miss AND with this recipe you can bake it yourself!
LikeLiked by 1 person
exactly!!!!
LikeLike