
Bread baking can be intimidating, and if you take it into sourdough territory, things are potentially even more stressful. Truth is, when compared to “regular” bread made with commercial yeast, sourdough is very forgiving. In part because it is a slower process, and it offers a lot of flexibility in terms of timing, amount of starter, level of hydration. It is easier to accommodate to any working schedule, once you get used to the rhythm. I am set on mixing the dough from 5 to 9pm, shaping and retarding in the fridge the whole night, baking early next morning, straight from the fridge. The breads from this post were all made with the same simple formula, mostly white bread flour, a touch of spelt. After bulk proofing for 4 hours at room temperature, they were shaped and placed in the fridge to sleep and dream overnight. Then, the real fun started. I tried a few different things, as you will see. It’s great that the husband enjoys a slice of bread for lunch several days a week. Because the home bakery has been working overtime lately!

CLASSIC SOURDOUGH BREAD
(from the Bewitching Kitchen)
100 g active starter (at 100% hydration)
375 g water, room temperature
450 g bread flour
50 g whole-wheat flour
10 g salt
Mix all ingredients for the bread in a large bowl, making a shaggy mass. Let it sit at room temperature for 30 minutes. Mix gently folding the dough a few times until smooth.
Allow it to ferment for 4 hours at room temperature, folding the dough 3 times during the four hours, no need to be precise about the spacing of folding cycles. Just make sure you fold it a few times. At the end of four hours, shape it either as a round ball or a batard.
Transfer to a well floured banneton, seam-side up, and place in the fridge overnight, 8 to 12 hours, longer if needed.
Next morning, heat the oven to 450 F. Invert the shaped loaf, still cold from the fridge over parchment paper. Dust the surface with a little flour and slash to your liking. Or, dust with cocoa powder using a stencil.
Place in a cold Dutch oven, cover, and stick in the hot oven for 30 minutes with the lid on, and 15 more minutes with the lid off. Allow it to cool completely before slicing.
ENJOY!
to print the recipe, click here
Comments: Cocoa powder is a nice way to create contrast without affecting taste. You will not detect any bitterness or cocoa flavor in the bread, don’t even worry about it. The sourdough nature will be pretty much unaffected by the thin layer of cocoa on top. Right before baking the bread, lay your stencil on top of the shaped dough, sift cocoa all over. Remove the stencil carefully, slash the bread and bake.

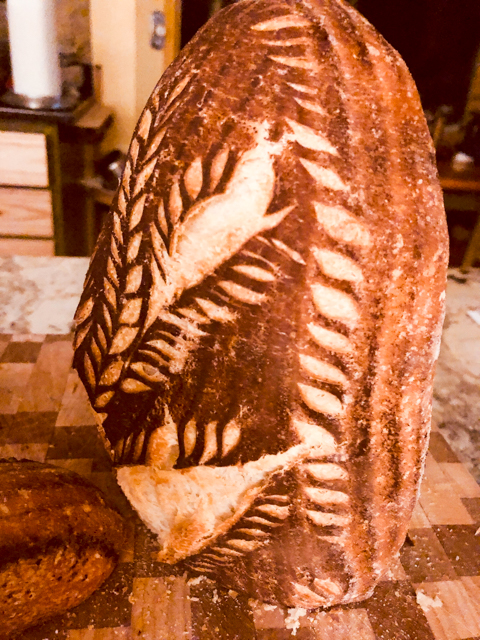
You have two options here, slashing right before adding the stencil, or after. I think slashing before might be better, and that’s what I’ll be doing from now on. The other thing to keep in mind is that you need to coach your bread to preserve the design as much as possible during baking. With that goal in mind, make one or several reasonably deep slashes around the perimeter of the design, so that – all things working as planned – the bread will burst around the design, not in the middle of it. But, of course, bread has a mind of its own, and part of its charm is that you just never know…

I did not expect to have such amazing oven spring, but Polaris, my newly named starter, is absolutely amazing! I got it from Elaine, and you can get it too (as well as the gorgeous bread lame you can see in the composite photo) with a visit to her site here. She ships worldwide, by the way.
Another way you can use cocoa powder is coupling it with a more delicate slashing using a brand new razor blade (this is really important, it must be super sharp). Coat the bread with a fine dusting of cocoa powder (or you can use a mixture of regular bread flour with cocoa for a lighter tone), then slash the pattern you like.

As you can see, I made the mistake of not coaching the bread into opening someplace else rather than the middle of my design. It was still a pretty nice loaf, but just did not look the way I wanted. Next morning we noticed a scary monster waiting for us in the counter top…
Hello there! Come here often?
😉
Now, to continue with the fun. For the following bake, I made a slightly bigger amount of dough (starting with 600 g flour and increasing all other ingredients proportionally), then shaped two small balls (using roughly 200 g dough for each). The remaining dough was used to make a batard. The small loaves were proofed in cute little bannetons, about 5 inches in diameter. This picture shows them next to the regular sized banneton.

So we had not only a scary monster in the Bewitching Kitchen, but also an alien. Never a dull moment, my friends. Never a dull moment.
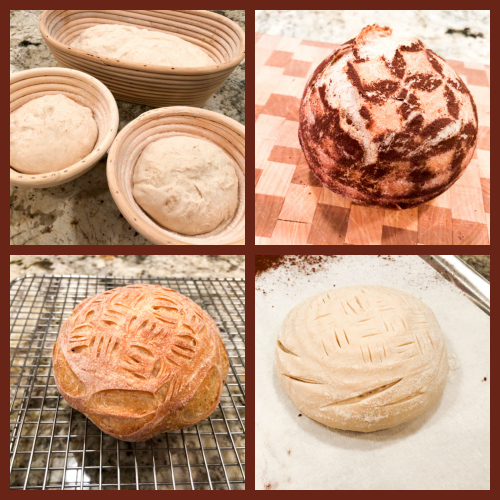
One of the small rolls received a cocoa-stencil, the other got slashed in a basket-pattern. Exact same dough and time of fermentation, baked side by side in the Dutch oven. These would be excellent bread-gifts for the holidays, maybe with a special stencil design, like a small Christmas tree, stars, or bells.
The bigger, batard, got just a straightforward slashing pattern, and upon baking, also showed its rebel personality… 😉

As usual, we enjoy a couple of slices on the day I bake, next morning the bread is sliced and placed in the freezer. Baking once or twice a month is enough to keep up with our bread consumption. But, I confess that the temptation to bake every week to try something new… is not negligible (sigh).


ONE YEAR AGO: Pasteis de Nata
TWO YEARS AGO: New Mexico Pork Chile, Crockpot Version
THREE YEARS AGO: Chocolate on Chocolate
FOUR YEARS AGO: Double Chocolate and Mint Cookies
FIVE YEARS AGO: The Story of my first Creme Brulle’
SIX YEARS AGO: Sourdough Mini-rolls
SEVEN YEARS AGO: Focaccia with Sun-dried Tomatoes and Gorgonzola
EIGHT YEARS AGO: Mediterranean Skewers
NNE YEARS AGO Fettuccine with Shrimp, Swiss Chard, and Tomatoes

Wow! Awesome!! It is indeed a real fun, now I understand why your home bakery is working overtime. 🙂
LikeLiked by 1 person
it’s so much fun! too bad we don’t have kids or teenagers living in the house so that consumption would be higher… I love baking bread, but with just the two of us, it can be tricky
LikeLiked by 1 person
So true! 🙂
LikeLike
OMG!!! look at that holes! too pretty to eat 🙂
I will try your sourdough recipe as the one I have is too soft 😀
LikeLiked by 1 person
give it a try! I really think some whole-wheat helps a lot with taste and texture – if you don’t have spelt, just regular whole-wheat works fine!
LikeLike
They’re all so beautiful!! I want to make loaves like yours x x x
LikeLiked by 1 person
hummmmm…. I seem to remember several pretty striking snowflake decorated sourdough loaves coming from your kitchen…. 😉
LikeLiked by 1 person
😘😘😘
LikeLike
Stunning loaves … the colour and oven spring is amazing. Makes me feel rather inadequate as a sd baker to be honest. I looked at Elaine’s ‘formula’ on her blog in the past and it seemed very elaborate/complicated so I’ve yet to try it. I like the neat recipe you posted above and may give it a try with my own starter.
LikeLiked by 1 person
Actually this formula is not too different from Elaine’s, the method of folding also similar – give it a try, I am sure you will be hooked! 😉
LikeLiked by 1 person
Thank you. I will. Pizza baking this weekend so not as soon as I’d like. 🙂
LikeLike
Wow. Those holes and that ear. True bread porn. I love all of your tips too.
LikeLiked by 1 person
still not quite sure about the slashing and cocoa powder showering thing – there are advantages in doing both ways, slashing before and slashing after dusting the surface, but as usual with bread, once you do it, it’s done. No going back 😉 I will try something else this weekend, I have a plan (wink, wink)
LikeLike
Don’t tempt me! Those loaves look such fun but living on my own I have a serious bread consumption problem! A pity dogs don’t eat toast for breakfast.
LikeLiked by 1 person
it is hard to bake bread when living alone – but they freeze so well in slices, so it’s doable. You probably end up baking maybe once a month and that will be enough to keep you going…
LikeLike
by the way, I just thought about your dogs going “WHO says we don’t eat toast for breakfast?” 😉
LikeLike
Well, actually I don’t eat toast for breakfast! Also I am incredibly good at not letting things “accidentally” drop. My husband used to be rather naughty in that regard. So in the past we did have dogs who ate toast!
LikeLike