
My first bread bake of 2018!
If you want to impress your guests or family with a bread that is actually surprisingly easy to shape, look no further, gather your ingredients and go to work…
The recipe comes from the Craftsy online class “The Baker’s Guide to Artisan Bread Shaping” taught by Chef Ciril Hitz. You can use any bread dough you like, as long as the hydration level is not too high (65% is a good starting point). For the couronne, you will need almost a full kilogram of dough. Roughly that would be 600g flour (I used 550 g all-purpose white flour and 50g whole-wheat), 390 g water, 12 g of salt, 3 g of yeast. Once the bread goes through the bulk fermentation, preferably in the fridge, you can proceed with the final shaping. You can also double this recipe that calls for a pre-ferment instead. Again, the most important here is the hydration level to be kept more or less at 65%.
OVERVIEW OF SHAPING
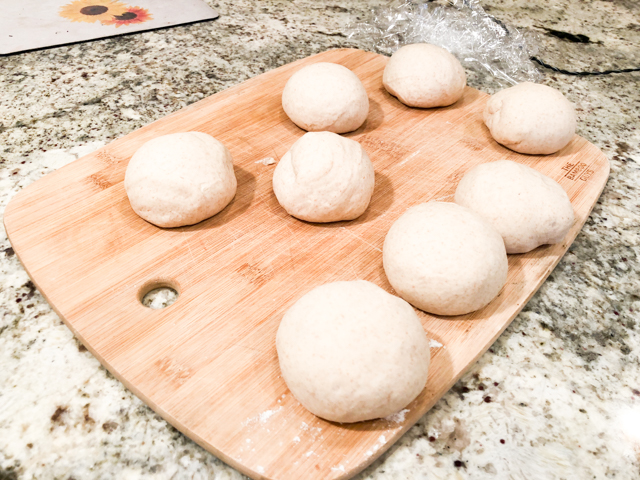
If you performed the bulk fermentation in the fridge, bring the dough to room temperature and leave it for 30 minutes. Then, divide it in 9 portions of roughly 90g each (you will have a small amount of dough leftover, pita anyone?). Shape eight of the balls as tight rolls, and reserve a portion of 90g unshaped.
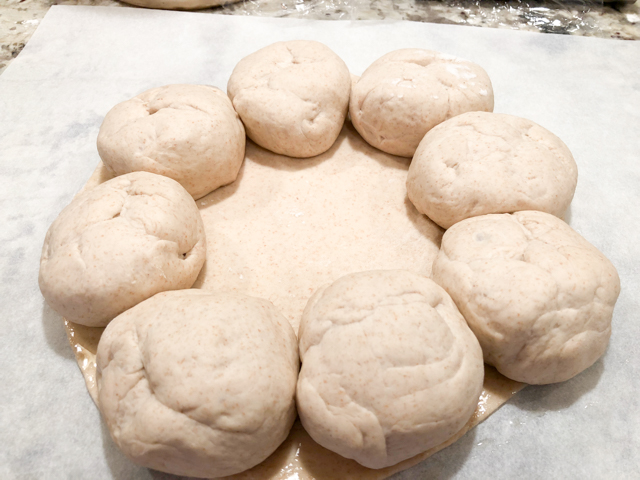
Roll the last portion of 90g of dough as a circle measuring about 10 inches in diameter. It should be quite thin, so work patiently and allow the dough to rest in case it tightens up on you. (It’s the gluten speaking, but it calms down with some time to itself). Once you get the dough rolled out, brush a little olive oil on the edges, then place the eight balls of dough sitting on the perimeter, making sure the seam is facing up.
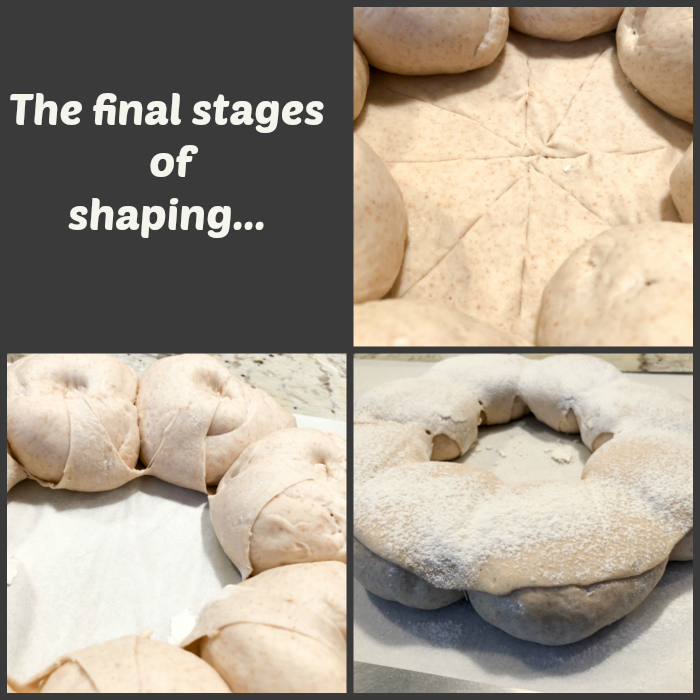
Now let the shaped bread rest for 60 to 90 minutes, depending on the temperature of your kitchen. Since it was pretty cold, I left it proof for a full 90 minutes. Once that is completed, make cuts with a very sharp knife on the center of the rolled dough, in a star-shape, so that each ball is facing a little triangular flap of dough. Carefully lift the edge of the triangle and fold it over each ball of dough, sticking it firmly at the top. I found it easier to use small scissors to help with this step. Now carefully flip the whole thing over, and dust the surface with flour. You can see the whole process in the composite picture below.
Bake in a 470F oven for 30 minutes, with initial addition of steam. I baked it over a stone, and poured a cup of almost boiling water inside a baking sheet placed at the bottom of the stove. A little more hot water was added after 5 minutes of baking time. Remove the bread and allow it to completely cool over a rack…
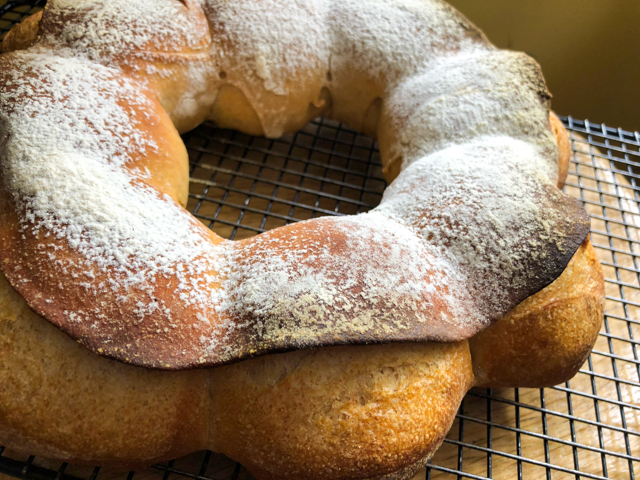
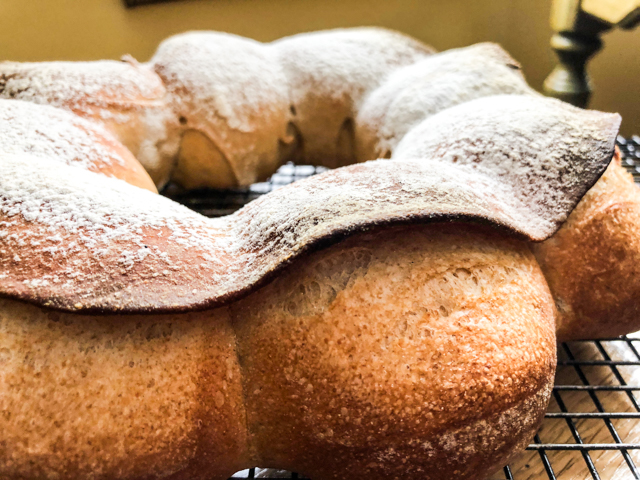
This bread was a bit of a singer, which I found quite pleasing… And I could not stop smiling as I looked at the beautiful crown on top… The brushing with olive oil prevents the flap from sticking, so that with the heat of the oven it floats in the air…
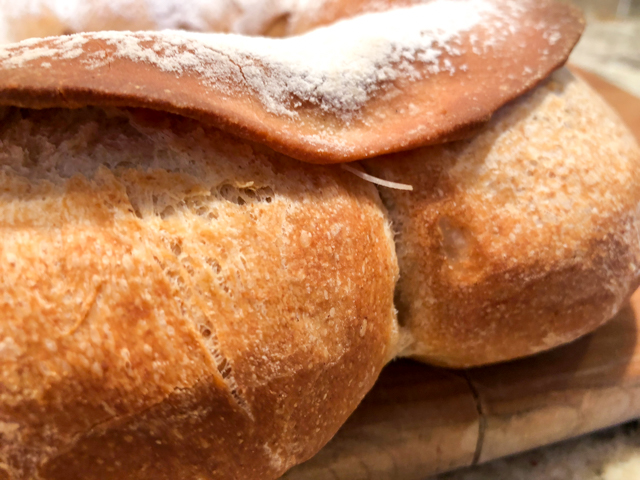
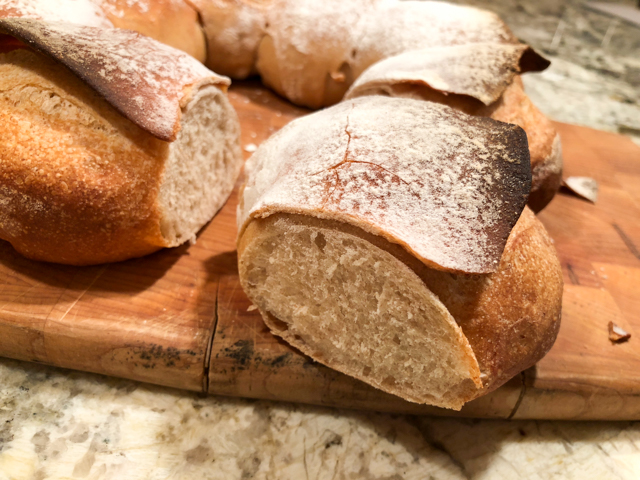
The crumb is not very open, and is expected from a bread with lower hydration, but it tasted great… It was perfect with our dinner of Chicken Parmigiana on a super cold Saturday evening. If you cannot skip winter, might as well make comfort food and a hearty loaf of bread…
As I mentioned before, I think the Craftsy classes online are worth every penny. Even though I am giving you a general idea of how to make this bread, you can bake it pretty much in real-time with Chef Cyril, getting all the tips from him, including how to shape the balls to get optimal surface tension. As you know, I only recommend things I love and this class is definitely one of them.
ONE YEAR AGO: A Special Birthday Dinner
TWO YEARS AGO: Duck Confit for a Special Occasion
THREE YEARS AGO: Tuscan Grilled Chicken and Sausage Skewers
FOUR YEARS AGO: Celebrate Wednesday with Pork Tenderloin & Apples
FIVE YEARS AGO: Salmon Wellington
SIX YEARS AGO: The Green Chip Alternative
SEVEN YEARS AGO: Weekend Pita Project
EIGHT YEARS AGO: Let it snow, let it snow, eggs in snow

That is so cool!!! when I saw the photo of the finished bread, I had no idea how you would even begin to create that finished shape, so to read the process is really interesting. Of course, I want to have a go RIGHT NOW!!!!
LikeLiked by 1 person
so glad to inspire you!!!!
LikeLiked by 1 person
You always do 😘
LikeLiked by 1 person
That is a thing of beauty!!! Well done. I’ll have to try making it next weekend. I made potato bread for the first time this last weekend and it was delicious.
LikeLiked by 1 person
potato bread is something I haven’t baked in a decade… love the texture and how moist it is… you are giving me ideas… tasty ideas…
LikeLike
That is exactly what I told a friend of mine. The texture and moistness was wonderful. I’ve never even bought some before let alone made any so it was a nice surprise. Can’t wait to see your tasty ideas 🙂 I wonder if some cheese or fresh herbs of some sort might work in it… I used my ricer to get the potato lump free too.
LikeLiked by 1 person
Impressive technique.
LikeLiked by 1 person
pretty simple, though… the kind of stuff I like, actually… looks more complicated than it is.. I am all for easy, you know… 😉
LikeLiked by 1 person
LOL … don’t tell people. Let them marvel. The way I let my dad marvel at the Rice Krispie squares I made for him. 🙂
PS: I’m all for easy too.
LikeLike
Hi Sally – this is absolutely gorgeous. Will try it soon using the recipe you gave. Thanks so much
LikeLiked by 1 person
hope you do! it is a fun baking project, and the bread tastes great too, I think adding a bit of whole wheat is key
LikeLike
Beautiful. I have to try it, what a wonderful shape!
LikeLiked by 1 person
I loved it too… I have two more to try in the near future, but since we don’t eat bread on a daily basis, I need to space my baking adventures a little…
LikeLiked by 1 person
Wow Sally. This is incredible. This loaf is so stunning. I can’t wait to try it. Seriously. Beautiful. How many ways can I say it =)
LikeLiked by 1 person
well, you keep talking, and I’ll keep smiling… a bread baking compliment coming from you is like a badge of honor!
LikeLike
Sally, that is an amazing bread, a thing of beauty indeed!
LikeLiked by 1 person
Nice to “see” you! yeah, I was absolutely thrilled by this bake…
LikeLike
What a great technique! Love the crown. I’ve gotta try this sometime – thanks!!
LikeLiked by 1 person
lovely, isn’t it? I am looking forward to my next adventure with special shaping… The dough is so basic, makes it a lot easier to get ready for it.
LikeLiked by 1 person
That looks absolutely delicious!
LikeLike