VEGETARIAN LASAGNA

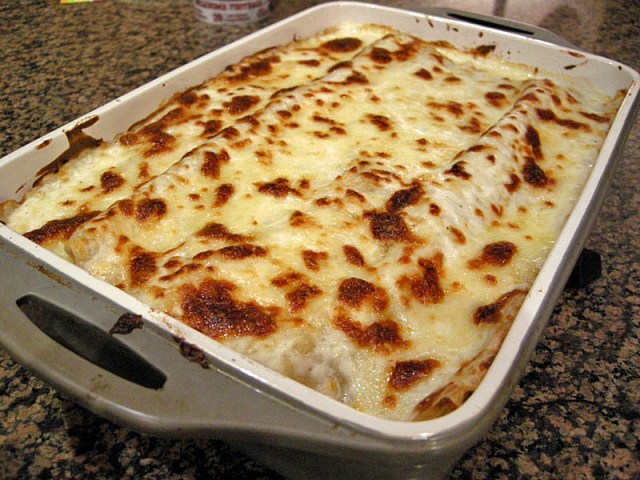
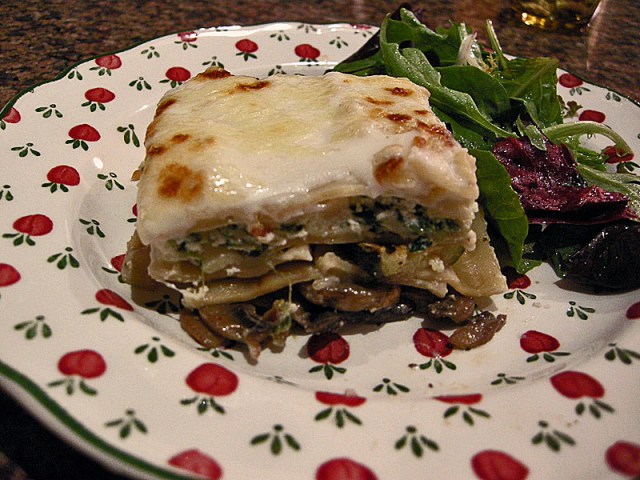
Lasagna: layers of noodles blending hearty Bolognese sauce, melted cheese or bechamel sauce with mushrooms, chicken, sausage…whatever your palate craves, then baked until bubbly and browned on top.  The creator of this dish deserves a place in the Gastronomic Hall of Fame. I like to think it was a grandma from Firenze, but some sources indicate that she was actually born in Greece! Whatever the origin, today you will find all sorts of lasagnas, some so streamlined that it’s inappropriate to even keep the name. If you google “vegetarian lasagna” you’ll find yourself sorting through many thousands of hits. I browsed through a few pages for inspiration, but then I made my own version, which even that old Italian grandma would be pleased with.
VEGETARIAN LASAGNA
(from the Bewitching Kitchen)

1 package of lasagna noodles
4 cups white mushrooms, sliced
2 T olive oil
salt and pepper
3 cups milk
3 T butter
4.5 T flour
ground nutmeg
3 medium zucchini, sliced lengthwise 1/8 inch thick
lemon juice and zest
1 pound ricotta cheese
1 egg, slightly beaten
1 small package of frozen spinach, defrosted and squeezed dry
1 ounce shredded mozzarella cheese
Grated Parmiggiano Reggiano cheese

Boil the noodles according to the instructions on the package (don’t overcook).  Plunge the noodles in ice cold water to stop them cooking, drain well and spread on a towel to remove excess moisture.  Lay them on a baking sheet brushing them ever so slightly with olive oil if you want to keep the cooked noodles in the fridge for assembling the lasagna later.  Cover well with plastic wrap.

Saute the mushrooms in olive oil, seasoning with salt and pepper, until soft and all moisture has been released and evaporated.  Reserve.   Mix a couple of tablespoons of olive oil with some lemon juice,  brush the zucchini slices,  season with salt and pepper and grill until nicely marked on both sides.  Reserve.

Prepare the ricotta filling by mixing the ricotta with the beaten egg and the spinach, seasoning with salt, pepper, and a little lemon zest.  Reserve.

Prepare the béchamel sauce:  warm the milk in the microwave.  Melt the butter in a heavy-bottomed saucepan, add the flour and cook for 2-3 minutes, stirring constantly.   Add the hot milk all at once, whisking to prevent lumps from forming.  Season with salt, pepper, and freshly ground nutmeg.   Cook until thickened (about 5 minutes).  Reserve (dot with butter and place a plastic wrap over it to prevent a thick film from forming).

Assemble the lasagna:  Spread some of the béchamel sauce on the bottom of a baking dish.  Layer noodles to cover the surface with a slight overlap.  Add the mushrooms, and moisten them slightly with a few tablespoons of béchamel sauce.  Add another layer of noodles.  Layer the zucchini slices over them, add another layer of noodles.   Spoon the ricotta mixture carefully on top, add noodles to cover it, and spread the béchamel sauce on top, making sure to cover the whole surface.   Add the shredded mozzarella, sprinkle some Parmiggiano, and cover with aluminum foil.

Bake at 375 F for 30 minutes, uncover, and bake for 15 minutes more to brown the surface.  If necessary, increase the oven temperature or turn the broiler in the last few minutes.   Remove from the oven, let it rest for 15 to 20 minutes before serving.

ENJOY!

to print the recipe, click here


Comments: Most current recipes call for no-boil lasagna noodles.  I’ve used them, and in a pinch I’d do it again, but not for a special dinner.  It is a little extra work to boil the pasta, but your guests (and you) deserve it. With boiled noodles the lasagna bakes more uniformly and the different layers better enrich each other, so that the final dish becomes more than the simple sum of its parts.  It’s gastronomic synergy in action  ;-).  If you don’t believe me, make two small, identical lasagnas, one by boiling the pasta and the other using the “no-boil” method. Then, let your taste buds be the judge.

Most vegetarian lasagnas use eggplant and mushrooms, a tasty combination.   I kept the mushrooms as one layer, but substituted grilled zucchini for the eggplant, because the texture of its skin is much better.  My version is lighter on cheese and the béchamel sauce filling, which I mostly reserved to the top of the dish with an appetizing gratin cover.

There’s something inexplicably nice about spending a Saturday afternoon preparing the fillings, cooking the noodles and assembling the lasagna, especially on a huge kitchen counter top with nice music in the background… 😉   I am very pleased with the way my veggie lasagna turned out, and hope that you’ll love it too.

Lasagna freezes extremely well, so we have leftovers conveniently packed in the freezer for our next trip home.  They’ll come in handy when we arrive from the airport,  a perfect antidote for the “peanut & pretzel treatment” that the airlines inflict on their passengers…  😉

ONE YEAR AGO: Brazilian Pao de Queijo (which happens to be one of my favorite posts)

Add to FacebookAdd to DiggAdd to Del.icio.usAdd to StumbleuponAdd to RedditAdd to BlinklistAdd to TwitterAdd to TechnoratiAdd to Yahoo BuzzAdd to Newsvine

receita em portugues na proxima pagina

DOWN HOME DIG-IN CHILI

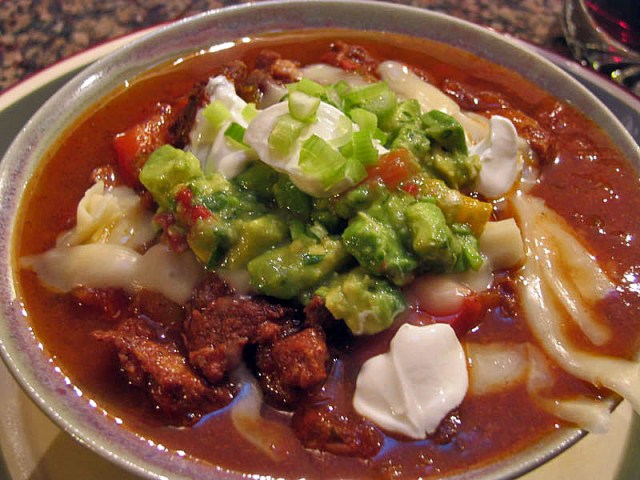
Get ready for a big spicy spoonful of  chili!  In the winter, give me chili with cornbread and cabernet; in the summer I’ll have chili with tortillas and tequila (or cold beer).  What a flavorful, succulent meal it is!   You’ll find chili everywhere, north, south, east and west; in cookbooks, food magazines and websites (like this one), with many of those authors claiming to divulge “the authentic” recipe.   Particularly in the Southern US, chili recipes provoke  discussions almost as heated as the peppers they contain.  But, I’m ready to jump into the fire, by sharing with you my husband’s favorite recipe.  It’s not the hottest or the spiciest chili you’ll find, but it’s meaty, delicious and the best  he’s ever encountered.  He made it for me for the first time when we started dating and we’ve cooked it together many, many times since then.


DOWN HOME DIG-IN CHILI

(from Bon Appetit, 1988)

1/4 cup vegetable oil
2 medium onions, finely chopped
2 green bell peppers, chopped
1 celery stalk, chopped
2 garlic cloves, minced
2 1/2 lbs stewing beef, chopped
2 lbs pork shoulder (Boston butt), chopped
4 cans (14 1/2 ounce) stewed tomatoes, drained, liquid reserved
salt and pepper to taste
1 bottle pale ale (12 ounce)
7 Tbs chili powder
4 jalapeno chilies, seeded
1 tsp cayenne pepper
1 tsp cumin
Hot pepper sauce (Tabasco type), to taste

Heat the oil in heavy large pot over medium heat. Add finely chopped onions, bell peppers, celery, and garlic and saute until onions are translucent, about 10 minutes. Remove vegetables using slotted spoon and set aside.

Increase heat to high. Add beef and pork; sprinkle with salt and pepper. Cook until browned, stirring frequently, about 10 minutes. Return vegetables to pot. Add tomatoes, ale, chili powder chilies, cayenne and cumin. Reduce heat, cover partially and simmer 2 hours, adding reserved tomato liquid if chili appears dry. Taste and adjust seasoning with salt and pepper. Uncover and simmer until thickened and meat is tender, 2 more hours.

Season chili with hot pepper sauce. Serve with green onions, cheddar cheese, avocado and sour cream.

Makes at least 8 servings.

ENJOY!

to print the recipe, click here

Comments: This favorite version of ours might very well be  “middle-of-the-road” in the debate about what should (or should not) be in a pot of chili. It doesn’t include beans, pleasing many, but it uses tomatoes, upsetting other purists.

We usually make it with  beef and pork, and we recently tried a mixture of lamb and pork.    We prefer this version, exactly as published 22 years ago (!!!) in Bon Appetit, by far. Some markets sell ground beef  for chili, but it’s better to buy a large cut of beef chuck,  some pork shoulder and cut them by hand into 3/4  inch cubes. The final texture is well worth the extra work.

Chili is ideal for entertaining, as it gets better when it sits in the fridge for a day.   Sometimes we make a full batch, enjoy “chili for two,” and save leftovers in the freezer for an encore another time.

This dish deserves recognition as a “Perfect Saturday Night Dinner” !


ONE YEAR AGO…    CINNAMON ROLLS

Add to FacebookAdd to DiggAdd to Del.icio.usAdd to StumbleuponAdd to RedditAdd to BlinklistAdd to TwitterAdd to TechnoratiAdd to Yahoo BuzzAdd to Newsvine

receita em portugues na pagina seguinte…..

Continue reading

HERB AND MUSTARD PORK ROAST

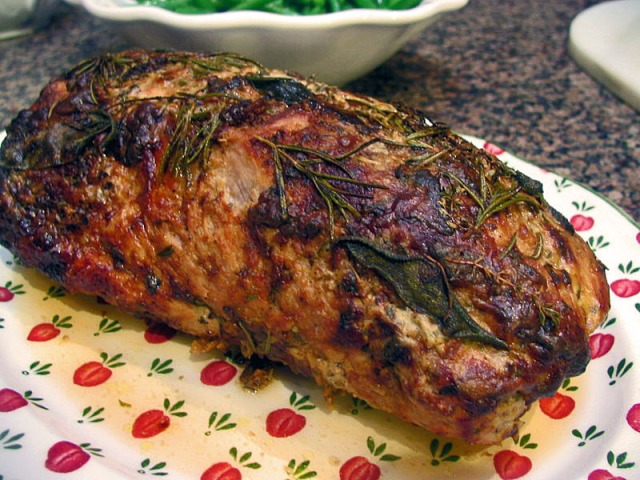
Suzanne Goin’s cookbook “Sunday Suppers at Lucques”  is a collection of seasonal meals from her award-winning restaurant in Los Angeles.  It is not uncommon that cookbooks by chefs of her caliber become coffee table books, that are rarely put to use,  because either the recipes are too involved or the ingredients are too hard to find.  That’s not the case for Sunday Suppers.   Many of its recipes are uncomplicated, but their small details make them special.   In this recipe for pork roast the double application of a simple  mustard and herb marinade develops a delicious flavor.  It’s hard to improve a classic, but this method does it.

HERB-ROASTED PORK LOIN with MUSTARD BREADCRUMBS
(adapted from Suzanne Goin)

1/2 cup Dijon mustard
1 Tbs thyme leaves + 6 full sprigs
2 Tbs fresh parsley leaves, chopped
3 Tbs olive oil, divided
6 cloves garlic, smashed
pork loin (center cut, about 3 pounds)
3 sprigs rosemary
3 sprigs sage
6 Tbs butter, sliced
salt and pepper

for mustard breadcrumbs
2 Tbs butter
1 Tbs Dijon mustard
1 tsp thyme leaves
1 tsp chopped parsley

Whisk the mustard, thyme leaves, parsley, and 1 tablespoon of olive oil in a shallow baking dish. Stir the garlic, and brush the mixture all over the pork loin. Cover and refrigerate overnight (or at least 4 hours). Remove the pork from the fridge one hour before cooking, after 30 minutes season it well with salt and pepper. Reserve the marinade.

Heat the oven to 325 F. Heat 2 tablespoons of olive oil in a large skillet until it is almost smoking. Place the pork loin in the pan, sear it on all sides, until well browned (do not move the pork around too soon, you need to allow the browning to take place). The whole process should take 15 to 20 minutes. Transfer the pork to a roasting rack, and brush the reserved marinade all around it. Reserve the pan to make a sauce.

Arrange the rosemary, sage, and thyme sprigs on the roast and top with 3 tablespoons of butter. Roast the meat until a thermometer reads 120F – about 1 hour and 15 minutes. Let the pork rest at least 10 minutes before slicing.

The pan sauce….

While the pork is roasting make a sauce: heat the pan you used to sear the meat on medium,  add 1/2 cup water (or chicken stock if you prefer)and stir until it boils, also scraping the bottom of the pan. Reduce by boiling a few minutes, swirl 3 tablespoons of butter and reserve until time to serve.

The mustard breadcrumbs…
Heat the oven to 375F. Place the breadcrumbs in a bowl. Melt the butter in a small saucepan, whisk in the mustard, thyme, and parsley. Remove from the heat, let it cool slightly, and add to the breadcrumbs, tossing to coat. Transfer to a baking dish and bake for 10 to 12 minutes, until golden brown.

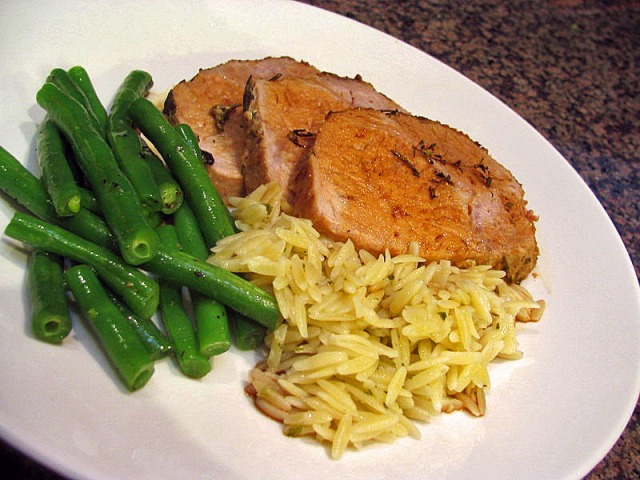
To serve, slice the meat, spoon the sauce over, and shower it with mustard breadcrumbs.

ENJOY!

to print the recipe, click here


Comments:
I’m picky about center cut pork loin, because it may become dry, even if I’m careful not to overcook it.  It is indeed difficult to overcome the lean nature of today’s pork. This recipe joins the two or three tried and true methods that I trust, and I imagine anyone who makes it will feel the same way.  With green beans, a little orzo on the side and my perfect match on the other side of the table…. life is good! 😉

Add to FacebookAdd to DiggAdd to Del.icio.usAdd to StumbleuponAdd to RedditAdd to BlinklistAdd to TwitterAdd to TechnoratiAdd to Yahoo BuzzAdd to Newsvine

INDONESIAN DELIGHT

I’ve never been to Indonesia, but like many Asian places,  it fascinates me.   Way too long ago, David Rosengarten had a show on satays, in which he highlighted the variety of cooking styles in Indonesia, a reflex of the huge number of populated islands forming the country: more than 6,000!   It is hard to imagine! I would be thrilled enough to visit just one:  Java… 😉

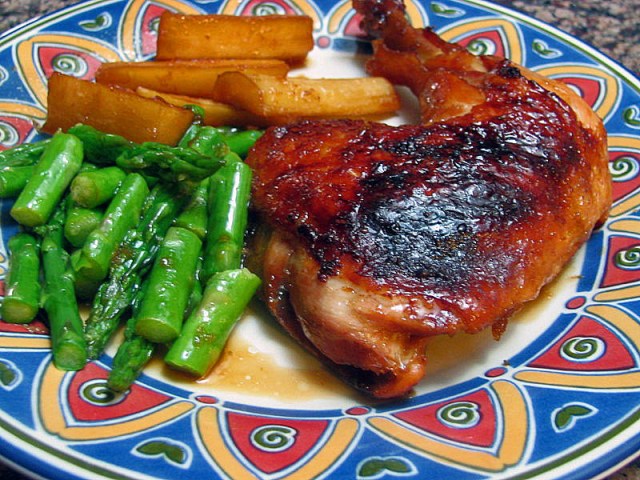
The Barefoot Contessa was the inspiration for last Sunday’s dinner: Indonesian Ginger Chicken. I’m fond of poultry marinated in soy, so her recipe  got my full attention (even if I did roll my eyes  when I read her endorsement of it: “Lauren Bacall gets cranky if we are sold out….” )

INDONESIAN GINGER CHICKEN
(adapted from Ina Garten)

1/2 cup honey
1/4 cup soy sauce
4 cloves of garlic, minced
1/4 cup freshly grated ginger
1 chicken, quartered
Parsnips, peeled and cut in large pieces

Heat the honey, soy sauce, garlic, and ginger in a small saucepan, until the honey melts and the sauce is smooth. Let it cool, and pour over the chicken arranged on a baking dish, skin side down.  Cover the dish with aluminum foil and marinate overnight in the fridge.

Heat the oven to 350F.  Place the dish in the oven, still covered, and cook for 45 minutes.  Remove the foil, turn the chicken skin side up, add the pieces of parsnips around the chicken, making sure to coat them with some of the sauce forming at the bottom of the dish. Increase the oven temperature to 375F and continue baking for at least 30 minutes, until parsnips are tender, and the chicken is fully cooked.  The sauce should be very dark brown.

ENJOY!

to print the recipe, click here

Comments: I modified the recipe  to increase the cooking time, add some parsnips and reduce the garlic.   I’m in the minority, I know,  but I dislike the over-use of  garlic.   And here’s another shocker, the parsnips were as good as the chicken itself.  We couldn’t stop eating them!  Lastly, the side portions of lemony asparagus brightened the whole meal,  to round out a delicious Sunday dinner.

Add to FacebookAdd to DiggAdd to Del.icio.usAdd to StumbleuponAdd to RedditAdd to BlinklistAdd to TwitterAdd to TechnoratiAdd to Yahoo BuzzAdd to Newsvine

CROWD PLEASING PULLED PORK

Suppose you´re facing the task of feeding a lot of people, but you´re short on time and low on cash. With this recipe you´ll have no worries, and everyone´ll love the moist, melt-in-your-mouth meat, with bits of tangy, crispy skin to please the palate!

PULLED PORK
(adapted from Gretchen´s and Mean Chef’s recipes)

1 whole pork butt, bone-in

for the dry rub
1/8 cup black pepper
1/4 cup paprika (I used smoked paprika)
1/4 cup turbinado sugar (or brown sugar)
2 tablespoons salt
2 teaspoons dry mustard
1 teaspoon cayenne pepper

Mix all the ingredients (except the meat)  in a bowl to prepare the dry rub (it´s a good idea to wear gloves).

Rub the pork all over with half of the dry rub, then place it in a plastic bag and refrigerate overnight. In the morning remove the pork from the bag and cover it with the rest of the spice mixture. If possible, let it sit at room temperature for a couple of hours, if not just place it in a 275F oven, uncovered on a rack in a roasting pan.

Roast until tender, almost falling apart. Depending on the size, it will take 7 – 9 hours. Longer will not hurt it; the desired internal temperature is 200F.

Pull the pork into pieces with forks, allowing some bits to fall on the floor to the delight of your dogs.

Serve the meat over sandwich buns with the sauce of your choice, or follow my “Brazilian variation”:  transfer the pulled meat to a clean baking dish.  Add 1 cup of water to the roasting pan and place it over the stove-top burner on medium heat to dissolve the bits of pork goodness that stuck to it during the long, slow roasting.  Strain it over a pyrex cup and allow the fat to rise to the top, then discard it.  Use the liquid to moisten the pulled meat, squeeze fresh lemon juice all over, cover with aluminum foil and place in a 350F oven for 20 minutes before serving over rice and beans.  (You can leave it in the oven for longer, it only gets better).

ENJOY!

This recipe fits quite well in the ¨Perfect Sunday Dinner¨ category…

for comments and additional photos, jump to next page